No items in cart
Buy 2 Get 1 Free
Add 3 products to the cart and get the cheapest for free at checkout.
Add 3 products to the cart and get the cheapest for free at checkout.

.avif)
Tekno is a modern evolution of the legendary drum machines that shaped music culture. Use it to craft deep and massive synthesized drums from the ground up with complete flexibility—where no two hits are exactly the same.
With a combination of authentic circuit-modeling and cutting edge techniques, Tekno delivers the hardest-hitting synthesized drums ever put in a plugin.
Tekno is built to deliver powerful synthesized drums with minimal setup or tweaking.
To get started, simply add Tekno to an instrument track and use a MIDI clip, controller or the built-in sequencer to trigger its 18 voices.
By default, Tekno responds to MIDI note on/off input across two ranges, C1-F2 and C3-F4. To view the MIDI notes associated with each voice, click the MIDI cable icon in the top left corner of the menu.
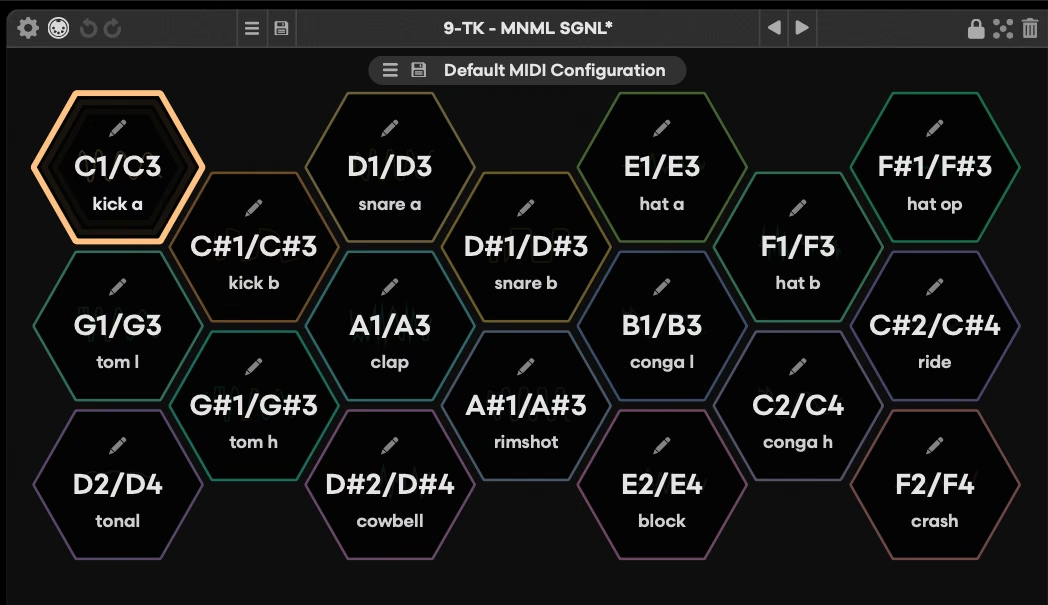
Tekno’s MIDI note mappings may be assigned manually if needed. Click the pen icon at the top of the voice tile to arm a voice for reassignment, then play the desired MIDI note on your controller.
Custom MIDI mappings can be saved and recalled from the drop-down menu.
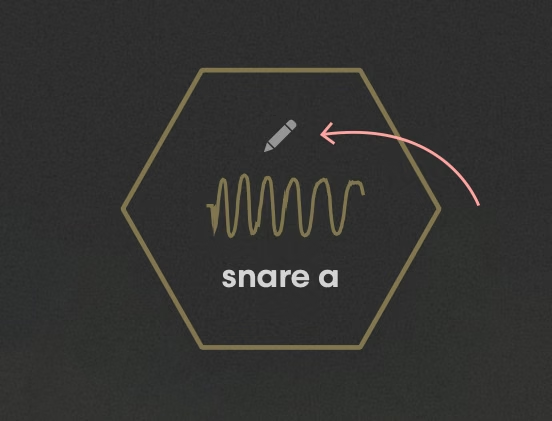
To adjust the sound of any voice, click the pen icon at the top of its hexagonal tile in the voices panel while in the default view.
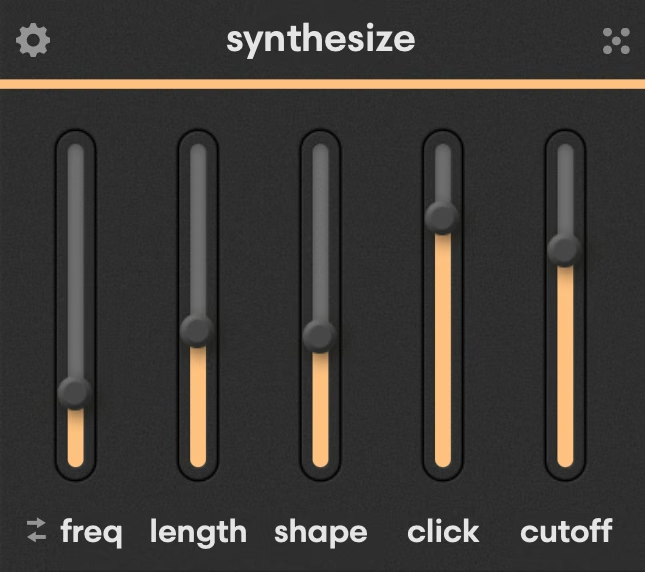
From there, the key synthesis parameters can be edited in the Synthesize panel at the bottom left of the plugin.
Moving rightward across Tekno’s bottom panel, you’ll find quick access to per-voice effects and mix settings as well as the master section with global tone shaping for Tekno’s stereo output.
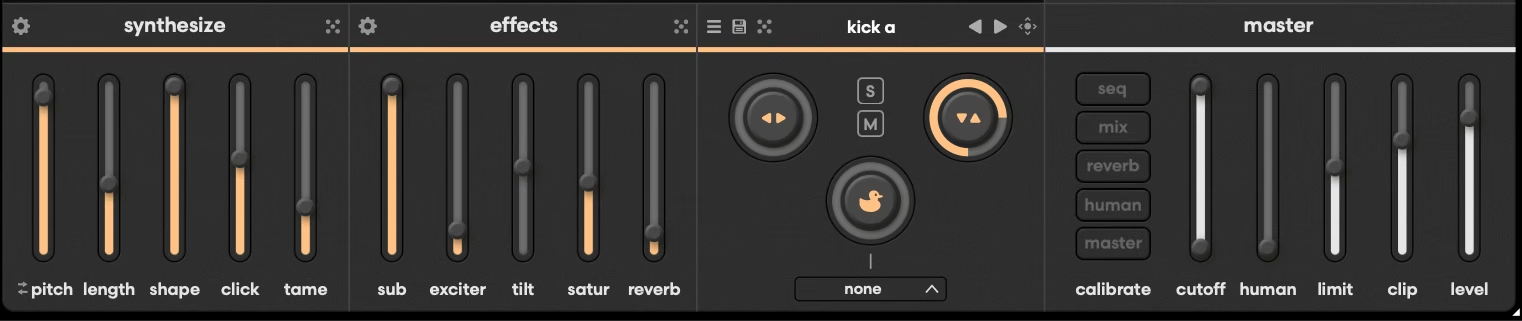
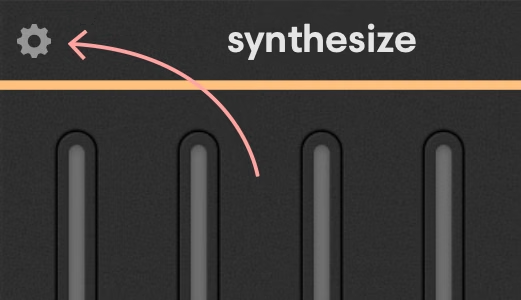
To dive deeper into the available parameters for each voice, click the cog icon in the top left of the Effects and Synthesize panels.
Tekno is like a boutique drum machine in plugin form. Use it anywhere your tracks call for fat and punchy percussion with the organic feel of classic hardware.
In that sense, Tekno is perfect as the core drum sound for all your productions. But beyond the basics, here are a few applications that take advantage of its unique capabilities.
Analog drum synthesis was the beating heart of the most iconic drum machines in music history.
Originally disregarded for their lack of realism, producers of early electronic music found that the synthesized kicks, snares and percussion of 80s-era drum machines had a unique power on the dancefloor.
Tekno isn’t a part-for-part emulation of any specific hardware from the past, but it takes plenty of inspiration from the classics and brings their beloved sound into the modern era.
Tekno’s kicks, snares, toms and congas draw the most from these classic methods of drum synthesis.
Tekno is a drum synthesizer. That means that none of its voices include prerecorded audio of any kind.
While loops and one-shots can create great grooves, sampled material is ultimately repeated audio that can become static and lifeless over time.
While some sample-based instruments can mitigate this, drum synthesis is different.
With Tekno, each new hit is synthesized from scratch upon receiving MIDI—just like a hardware analog drum machine.
The result is a more lively and dynamic sound palette that feels consistent without ever getting stale.
Bring in the onboard swing along with Tekno’s Humanize controls to add even more variation for captivating beats.
Each of Tekno’s 18 voices is its own self-contained synth, made specifically for its role in the kit.
The architecture of each voice differs by instrument, so we’ve simplified the controls down to the five key parameters you need to sculpt your sound.
Even so, that’s a lot of different parameters to set! If you’re looking to create new sounds quickly, you’ll love Tekno’s intelligent patch and voice randomization capabilities.
Our randomization algorithm is configured to avoid incompatible settings and it generally avoids producing combinations that don’t work with one another.
Simply click the Dice icon in the main voice window to randomize all parameters, or use the corresponding ones in the Synthesize or Effects windows to randomize only those settings.
With effective randomization and real-time synthesis, Tekno lets you build beats with completely original drum sounds that hit hard enough for any modern mix.

From left to right, the top menu gives you the following options:
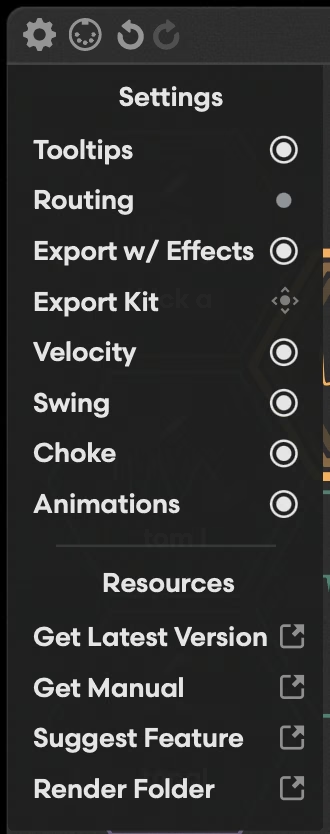
Show the tooltips for the parameter in focus.
Set the output destination for each voice while using Tekno in multi-output mode. In addition to all 18 drum voices, Tekno’s global Reverb effect can also be routed to its own dedicated output bus.
Consult your DAW’s user guide for how to configure plugins for multiple outputs.
Note: Tekno’s drum voices are calibrated to interact with the master section effects for the best results in stereo output mode. To control excessive levels, the Limiter and Clipper from the master section still act on voices routed to multi-output buses even though they are not summed with the other voices at the stereo output.
To get a completely clean voice output with no influence from Tekno’s master section, increase the Limiter threshold to maximum and set the Clipper gain to minimum.
Render samples with effects included when using the drag-and-drop sample export feature.
Render all voices in the current kit as individual audio samples by dragging the drag icon to your DAW or a folder.
Allow Tekno to respond to velocity information.
Add 1/8th note or 1/16th note swing to incoming MIDI as a percentage from 0 to 100%.
Assign sequencer voice lanes to any of the four available choke groups for classic drum sequencer behavior. Any number of voices can belong to the same group.
Disable animated UI elements for a static look.
Download the most recent build of Tekno.
Download the PDF manual.
Contribute to Tekno’s development.
Open the system destination folder for exported samples.
To open Tekno’s activation preferences, click the plugin title logo in the top right corner.
To learn how to tweak Tekno’s synthesize parameters, it’s important to understand the basics of analog drum synthesis.
The earliest analog drum machines had to work around the limitations of the circuit components that were available at the time. Much of their unique sound comes from happy accidents that arise from these limitations.
While Tekno isn’t limited to strict interpretations of vintage methods, it recreates some core mechanics from these instruments and even models some of their circuitry at a component level.
In a classic analog drum synth, a hit is generated by sending a pulse, or a square wave cycle with very short duration, through a resonant filter with feedback, damping, and other subtractive synthesis tricks.
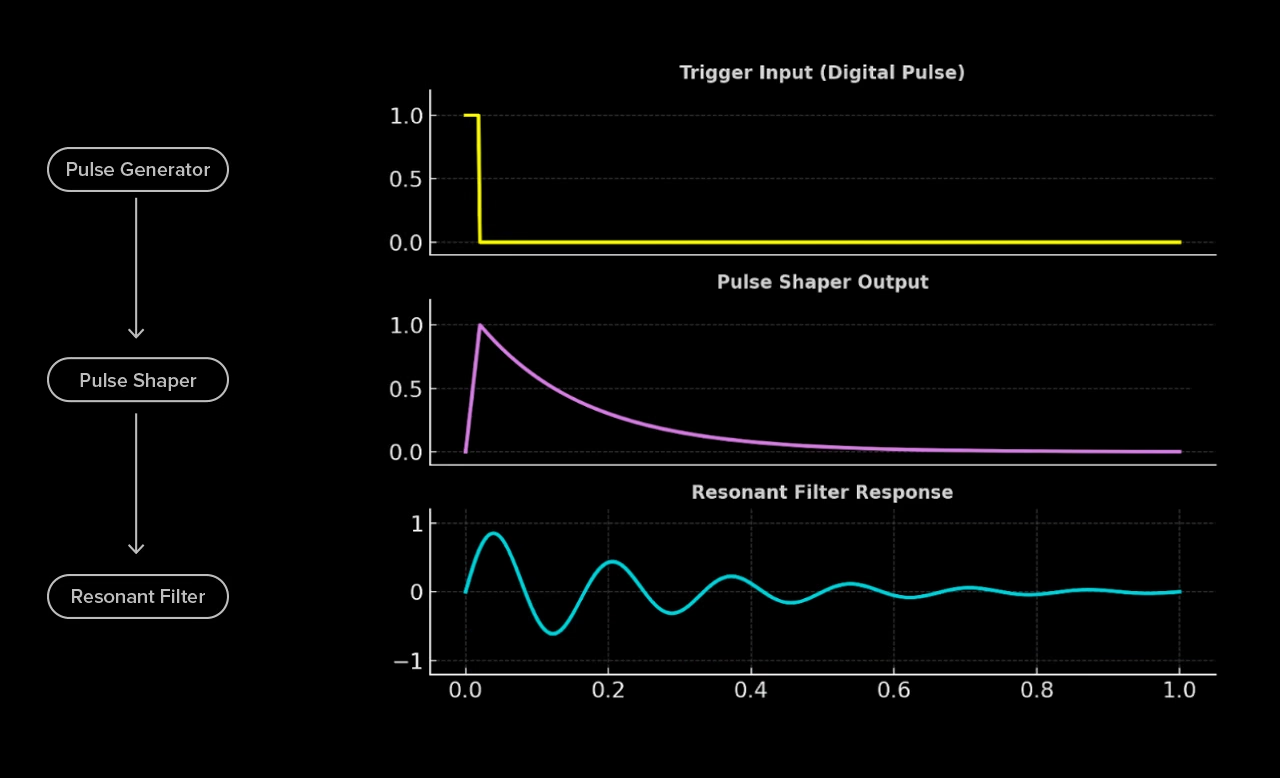
How the pulse is shaped before interacting with the filter network and other components plays a big role in the sound, along with the characteristics of the filter and non-linearities introduced by each element of the circuit.
Tekno’s core parameters manipulate these quantities, allowing you to design limitless flavors of analog percussion.
With those basics out of the way, here is a breakdown of each voice and the action of the synthesize and calibration parameters for shaping it.
Tekno is composed of 18 individual drum voices with varying synthesis methods used to create their sound.
Each voice can be intelligently randomized using the dice icon. To exclude a voice from randomization, click the lock icon in the top right corner of Tekno’s main menu bar to access the voice lock menu.
Some of Tekno’s voices are influenced by the classic analog techniques from sought-after vintage units, while others take a more modern approach with no equivalent in either hardware or software.
The result is an extensive palette of familiar and cutting edge sounds with a wide range of possibilities.
This section will provide a detailed breakdown of each instrument, including the voice architecture, synthesis parameters and additional calibration options to help you get the most from each instrument.
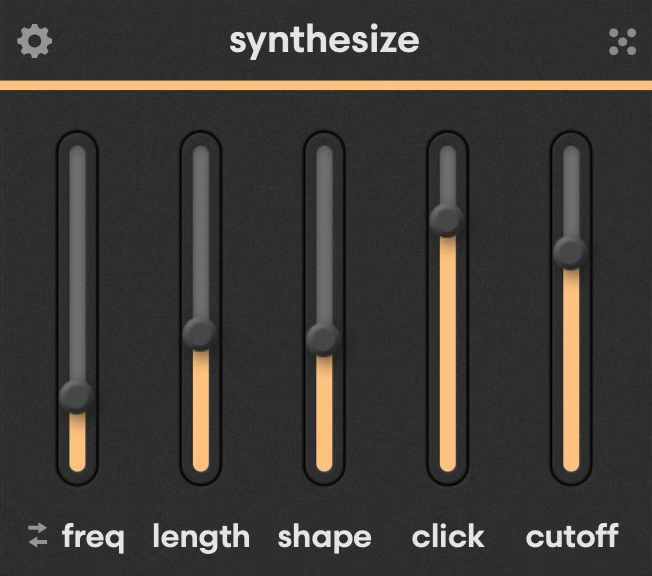
Kick A is one of the primary voices in Tekno. At its heart is an analog-modeled resonant filter. When excited by the trigger pulse, the filter rings at the frequency set by the Freq control. The frequency can be set in note values by clicking the arrows icon to the left of the parameter label.
A damped feedback network reinforces the resonance at the tuned frequency and decays over time. The intensity of the damping factor is controlled by the Length parameter and the shape of the trigger pulse can be manipulated with the Shape control. The high end content in the pulse signal is set by the Click control and the Tame slider is a final low-pass filter placed after the resonant filter to control the total amount of high frequencies.
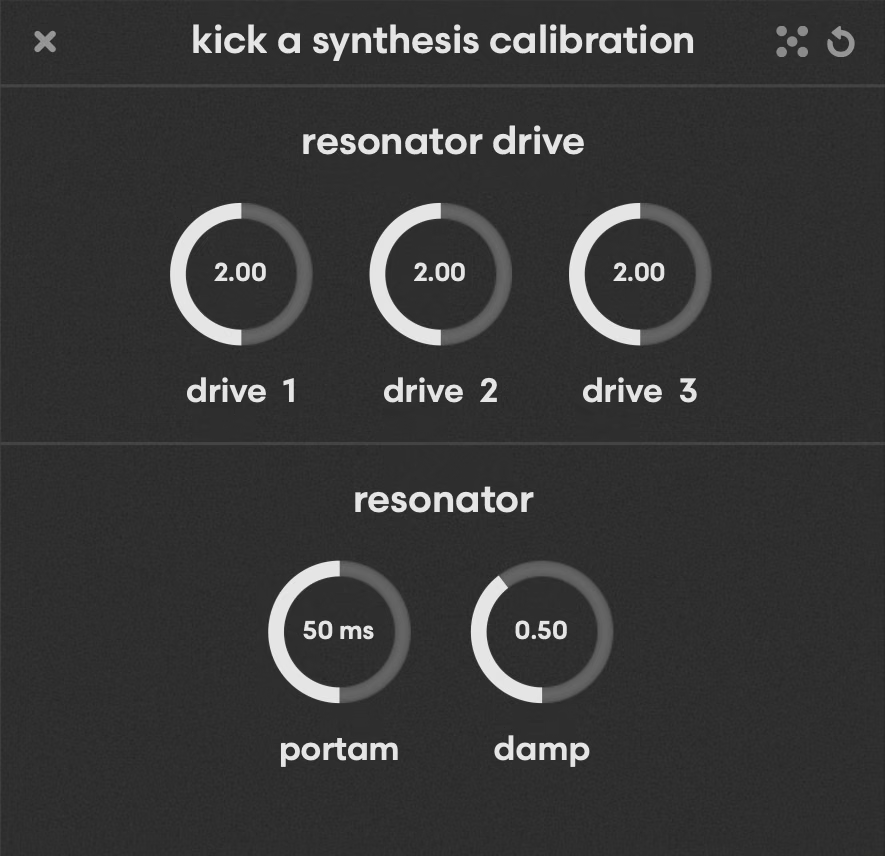
Kick A’s resonant filter is an accurate circuit model of a physical system with distinct non-linearities. The resonator drive section of the calibration menu lets you adjust the intensity of the harmonic distortion added by the three non-linear components, Drive 1, Drive 2, and Drive 3.
Resonator Damp controls the shape of the filter inside the resonator feedback path and the Portam control adds smoothing for changes in frequency that occur inside of the circuit.
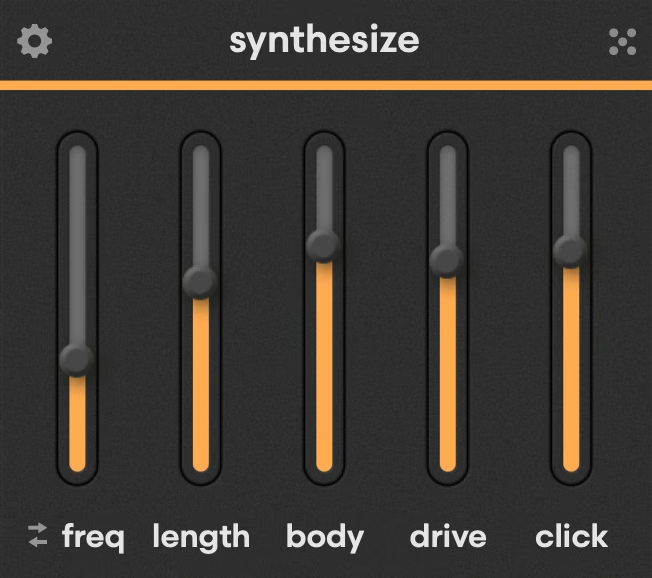
Kick B is similar to Kick A, but draws even more inspiration from analog technology.
Circuit modeled throughout, Kick B consists of a unique resonant filter excited by a pulse. In Kick B, the pulse shaper is derived from a common analog circuit and acts on the raw pulse signal before hitting the filter network.
In combination, these circuits are known for an incidental pitch modulation effect that arises from their unique properties. The Body slider gives you direct control over this incidental modulation.
Click controls the cutoff of a low pass filter placed after the resonant filter and Drive controls the intensity of non-linearities in the system by increasing the amplitude of the trigger pulse going into the filter.
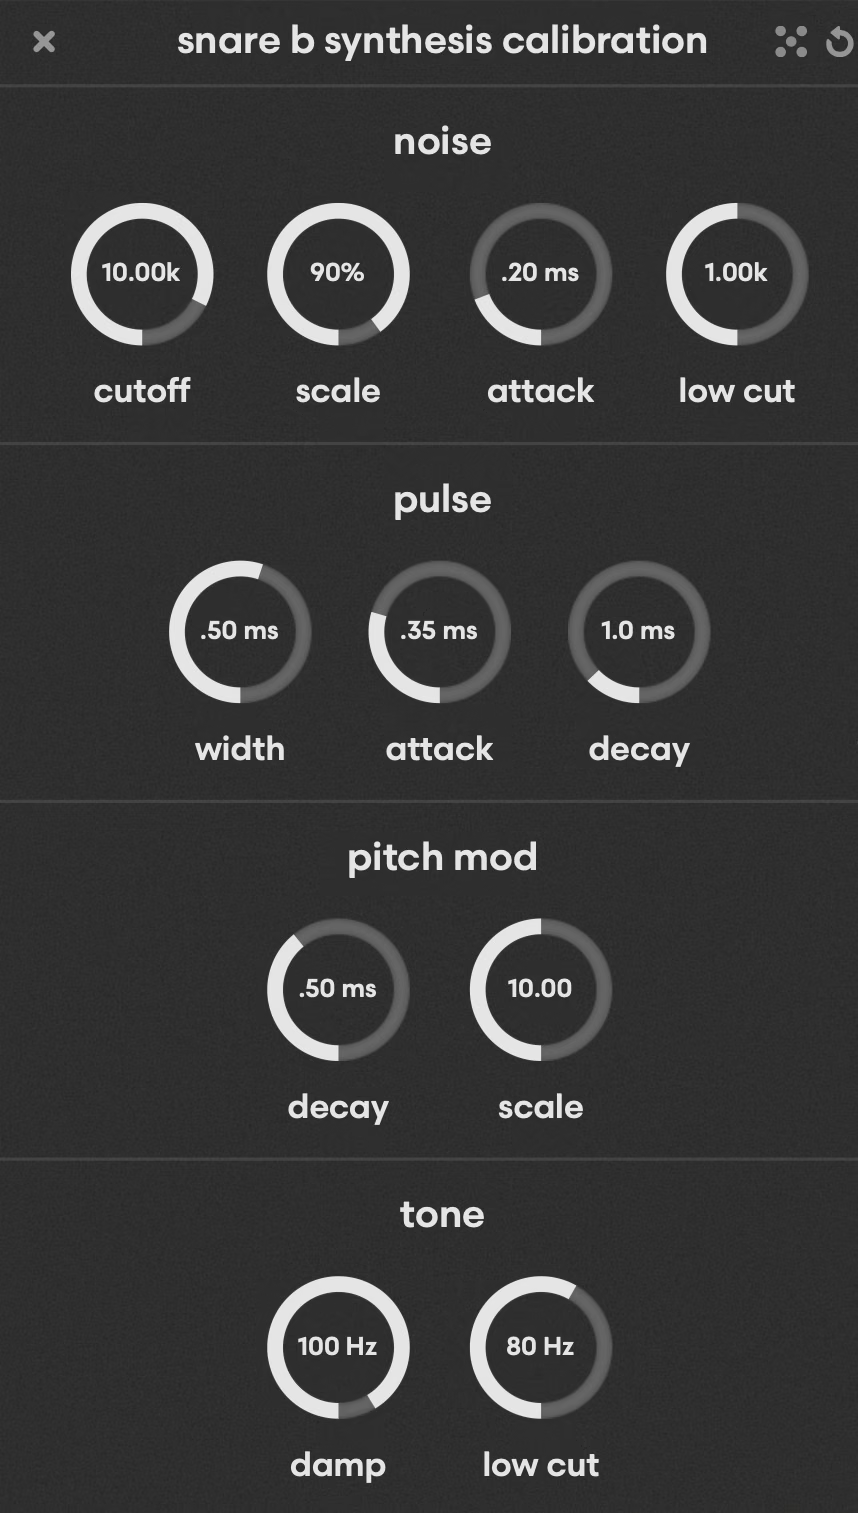
Inside the calibration menu, the pulse Width and Cutoff frequency can be adjusted, as well as the intensity (Scale) and shape (Decay) of the pitch modulation.
The analog-modeled resonator circuit contains some variable circuit quantities with interesting effects. These are made available in the resonator tweaking with resistance values for Feedback and Gain within the modeled network.
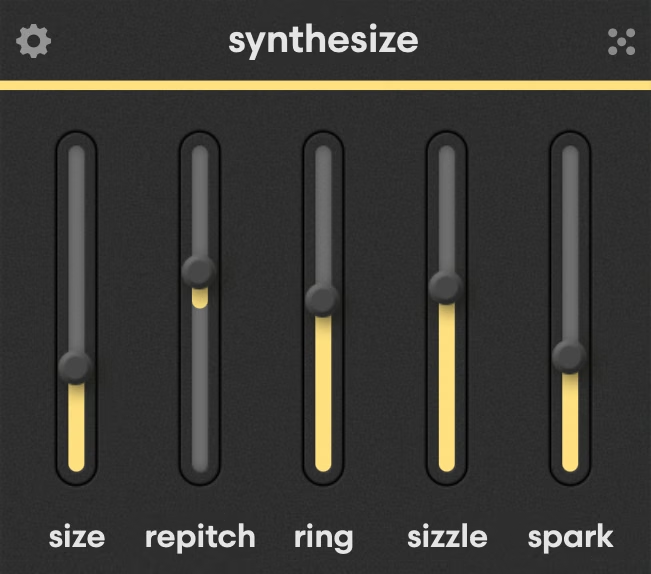
Snare A combines two sine waves to simulate the fundamental frequency and first harmonics with a triangle/sawtooth wave for the higher harmonics and noise source to simulate the snare wire.
The Size control is a frequency multiplier for the three tonal components and the Repitch control varies the audio playback rate with a similar effect to repitching a sample.
Ring affects the envelope of the tonal components, allowing for longer or shorter decay times.
Sizzle dictates the decay time for the noise component and Spark sets the overall level of the noise and introduces distortion through a nonlinear envelope generator.
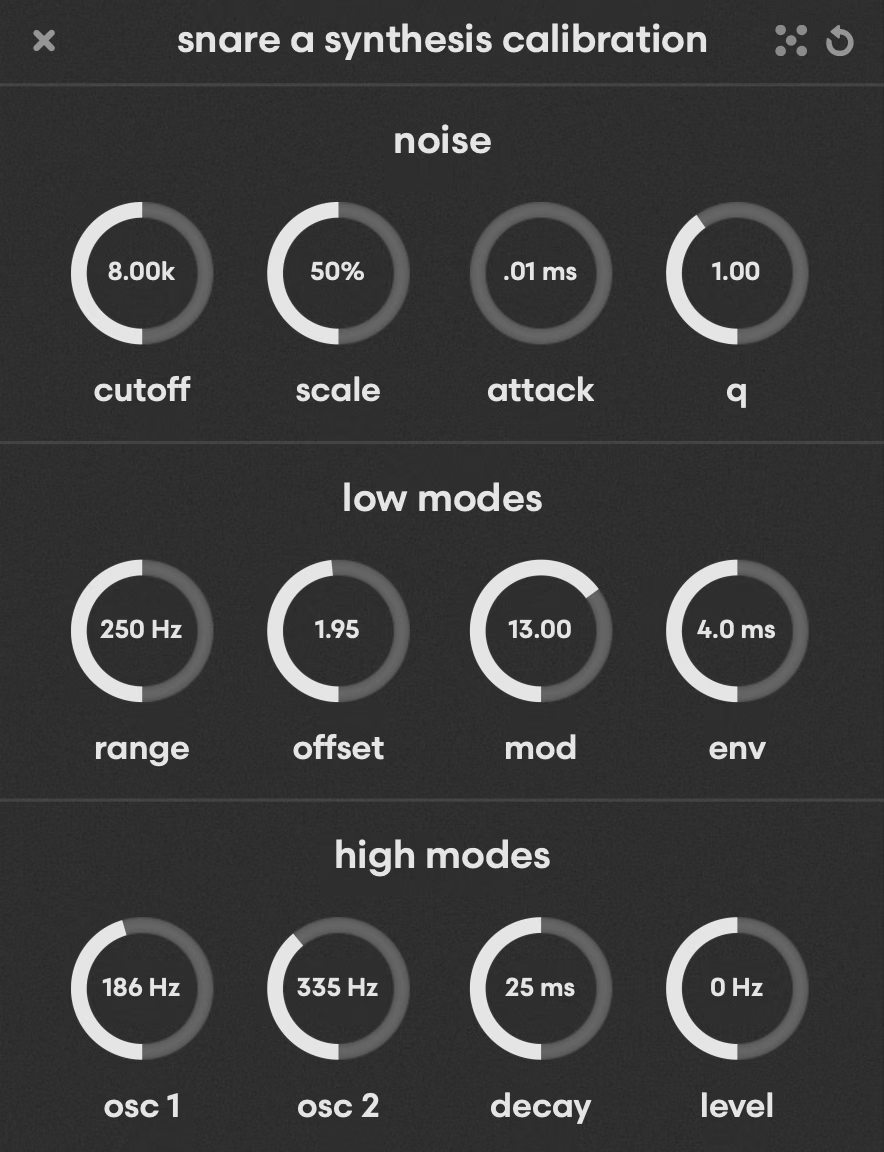
Snare A’s calibration menu allows you to set the characteristics of the noise source, including filter bandwidth (Q), Cutoff and the onset (Attack) and amplitude (Scale) of the noise signal hitting the non-linear envelope generator.
The low modes and hi modes menus let you set the ranges and frequencies of the tonal components as well as adjust their modulation depth, envelope characteristics and overall level.
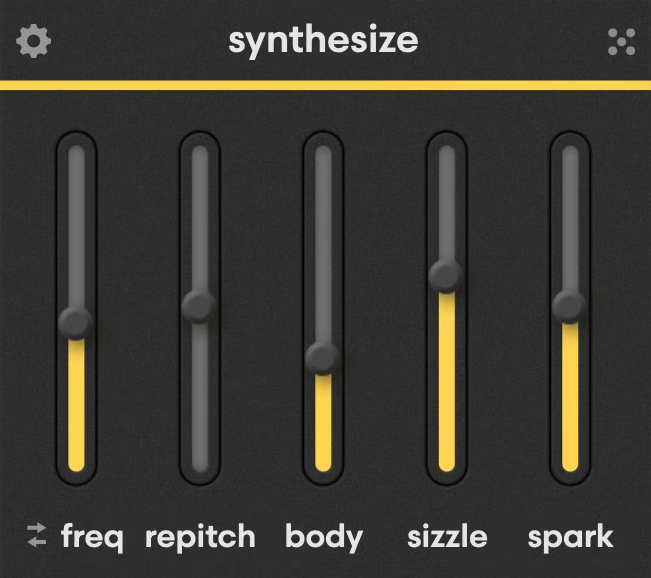
Snare B takes a similar approach to Snare A, with more directly circuit-modeled components represented.
A trigger signal gets shaped into a pulse that excites a pair of circuit-modeled resonant filters, along with an enveloped noise source.
The Freq control is available in Hz or note values and controls the fundamental frequency of the filter network.
As in Snare A, Repitch controls the audio playback rate for sampler-style pitch effects, Body controls the decay envelope and Sizzle and Spark control the noise envelope and level, respectively.
Snare B offers additional controls for the noise source, including Low cut, filter Cutoff, onset (Attack) and amplitude (Scale) of the noise signal hitting the non-linear envelope generator.
You can alter the pulse signal shape with Attack, Decay and Width parameters and affect the intensity of the pitch modulation with the Decay and Scale parameters within that menu.
The tone menu allows you to shape the cutoff of the filter in the feedback path with the Damp parameter while the Low Cut knob offers an additional high-pass filter last in the chain.
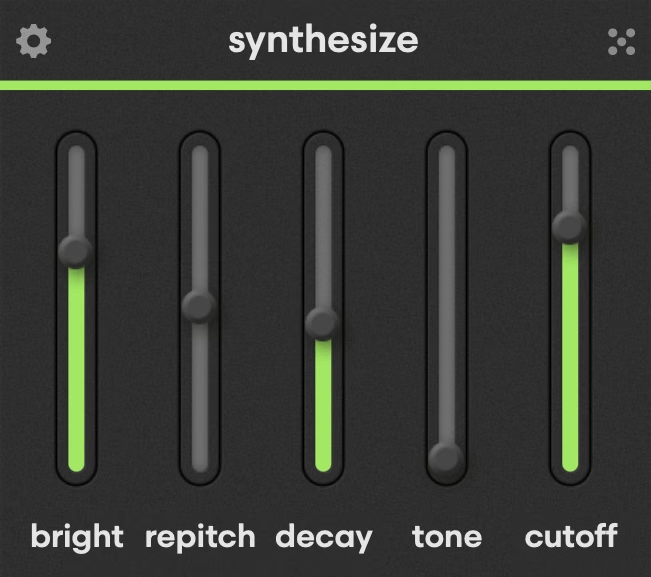
Hat A uses a unique noise source composed of multiple square waves tuned to inharmonic relationships.
The Repitch parameter uses the frequency distribution from one well-known noise circuit at +100% and that of another at -100%. You can blend between them to create unique combinations at values in between.
Decay controls the decay envelope, while Bright sets the cutoff frequency of a resonant filter after the noise source. And Cutoff controls a high-pass filter last in the chain.
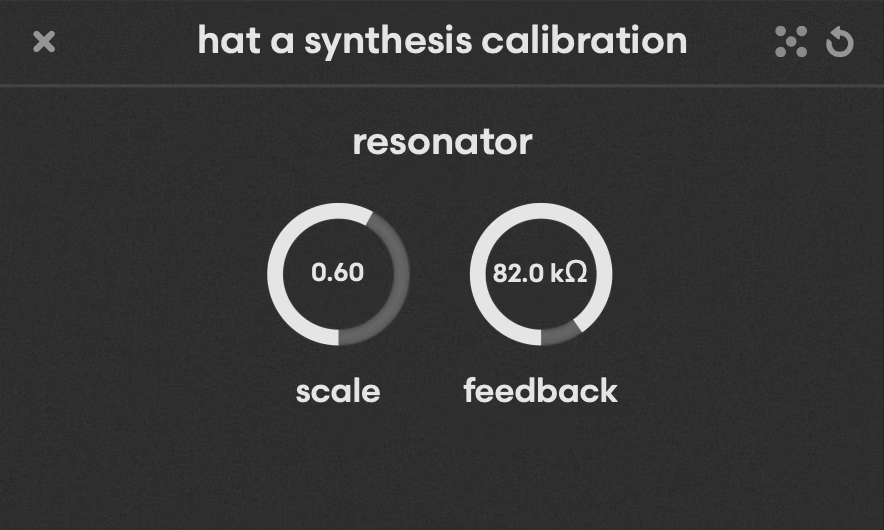
Hat A’s circuit-modeled resonator can be adjusted in the calibration menu by changing the resistor value of the Feedback circuit, affecting its overall impact and Scale, which adjusts the amplitude of the pulse signal, driving more extreme non-linear behavior at higher settings.
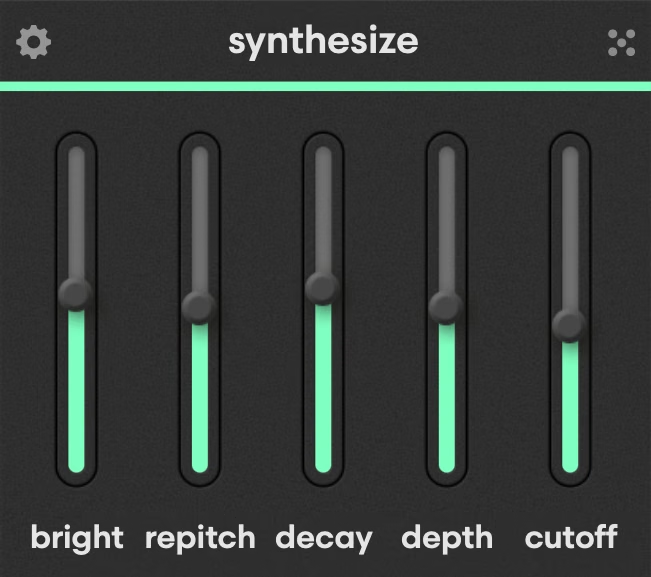
Hat B uses a square wave FM algorithm to generate a complex noise source with rich harmonics.
The noise excites a resonant filter with Brightness controlling the cutoff frequency, while in this case Repitch controls the FM oscillator pitch.
Decay adjusts the decay envelope and Depth affects the modulation depth of the FM modulator.
Finally, Cutoff controls a high-pass filter after the resonator for filtering out unwanted lows.
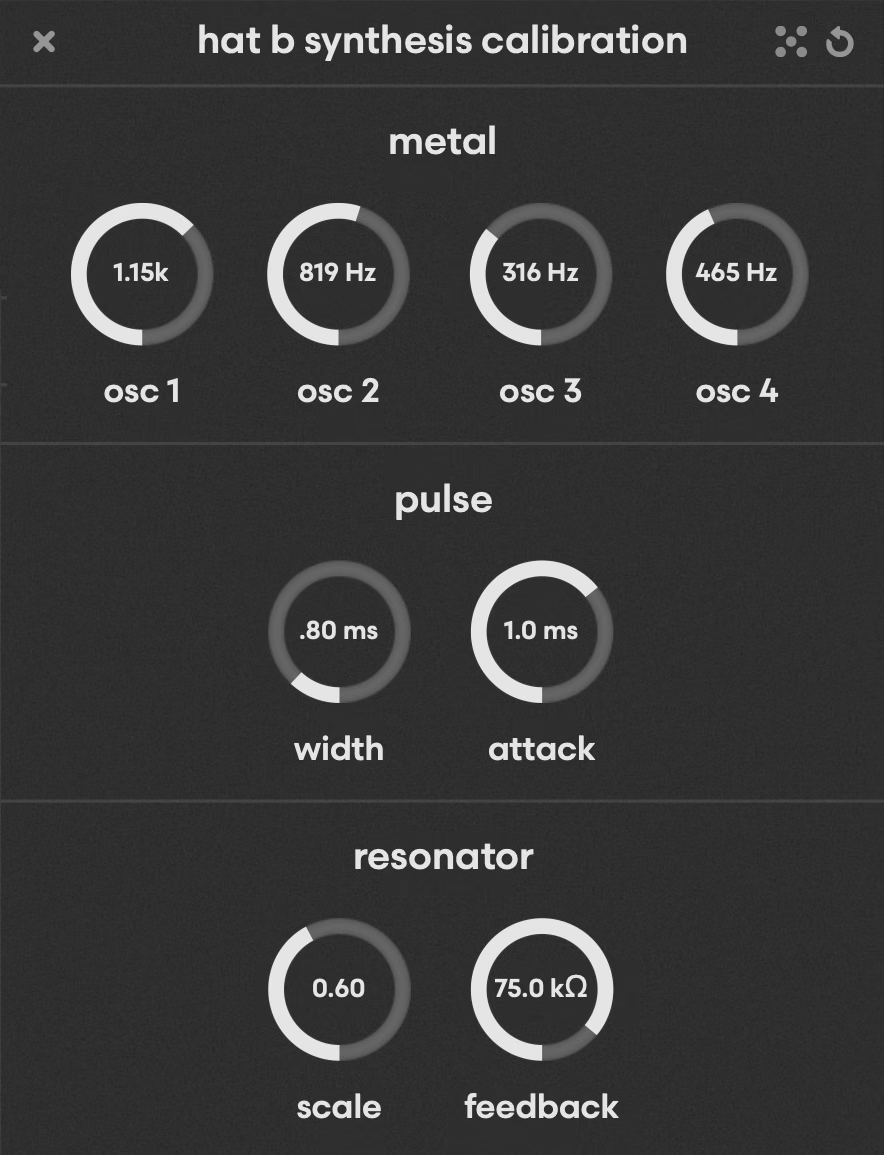
The Metal menu allows you to adjust the base pitches of the square wave oscillators within the FM algorithm.
The Pulse menu controls the shape of the trigger pulse with options for Width and Attack while the resonator offers Scale for the pulse amplitude and a circuit quantity for the Feedback resistor value.
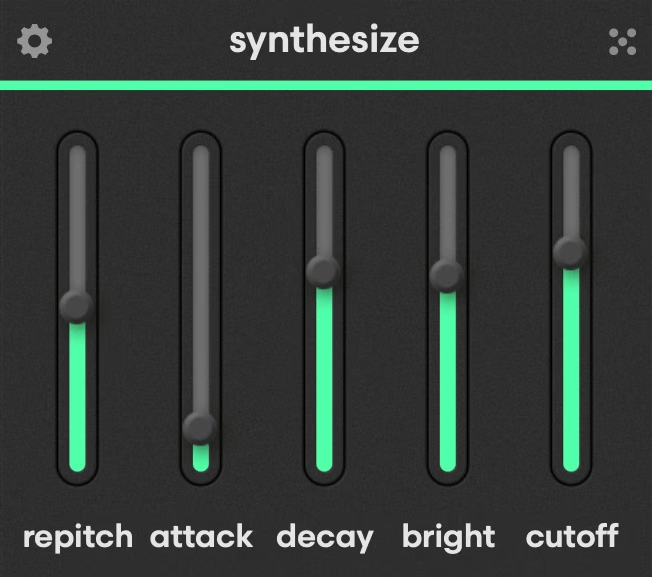
Hat Op is a variant of Hat B with similar synthesize parameters—Brightness controls the resonant filter cutoff frequency, Repitch affects FM oscillator pitch and Decay controls the FM modulation depth.
The range of Hat Op’s decay parameter is much greater than Hat B’s, allowing it to ring out for longer.
The Attack control applies an envelope after the resonant filter to smooth out the onset for classic open hi-hat sounds.
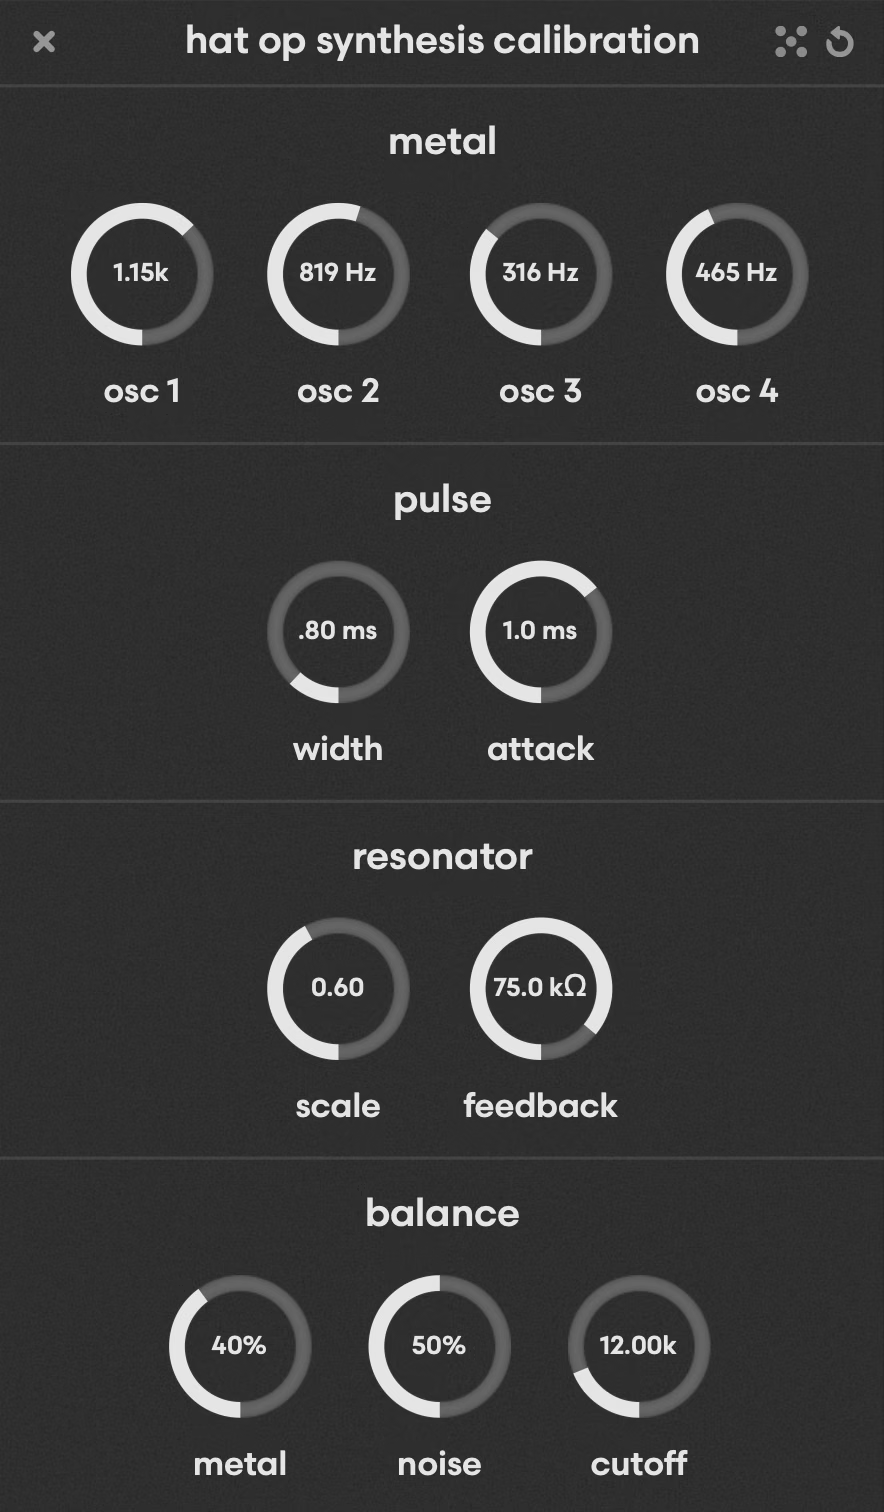
Hat Op’s calibration menu includes frequency values for the base pitches of the FM operators.
It also features shapeable pulse Width and Attack and circuit-modeled resonator Scale and Feedback controls.
Additionally, Hat Op offers a set of balance controls to mix between the intensity of the Metal component created by the FM oscillator and the Noise source with a low-pass filter Cutoff to sculpt the overall high end content.
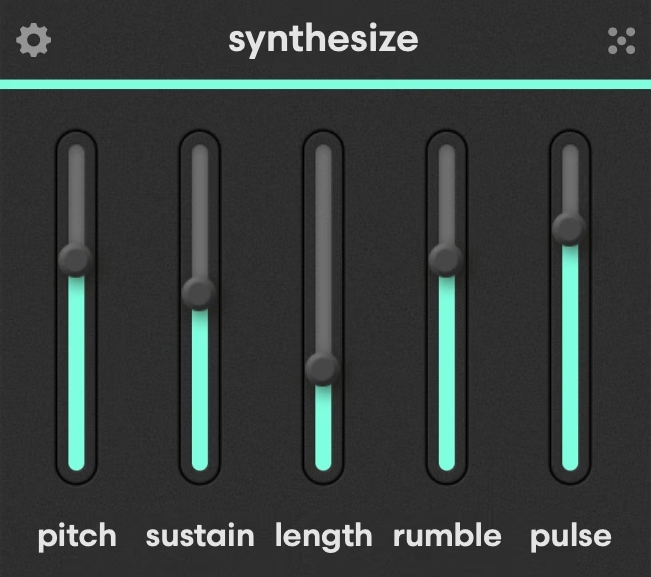
Similar to Kick B, Toms L and H use a trigger pulse with circuit-modeled shaper and resonant filter.
The primary difference between the L and H voices is the default pitch range available from the frequency control.
Unlike Kick B, the tom voices do not feature any pitch modulation, giving them a more distinct tonal character.
Freq controls the cutoff frequency of the resonant filter, Length adjusts its Q and Pulse provides additional frequency shaping for the pulse signal. Rumble introduces a unique low frequency noise signal meant to simulate the rattle of a physical drum head.
Sustain adjusts the envelope of the combined noise and tonal components.
Note: Tekno’s low and high tom voices are based on related synthesis architecture. Right-click a tom voice and choose Copy Settings to transfer its parameters to the corresponding high/low counterpart.
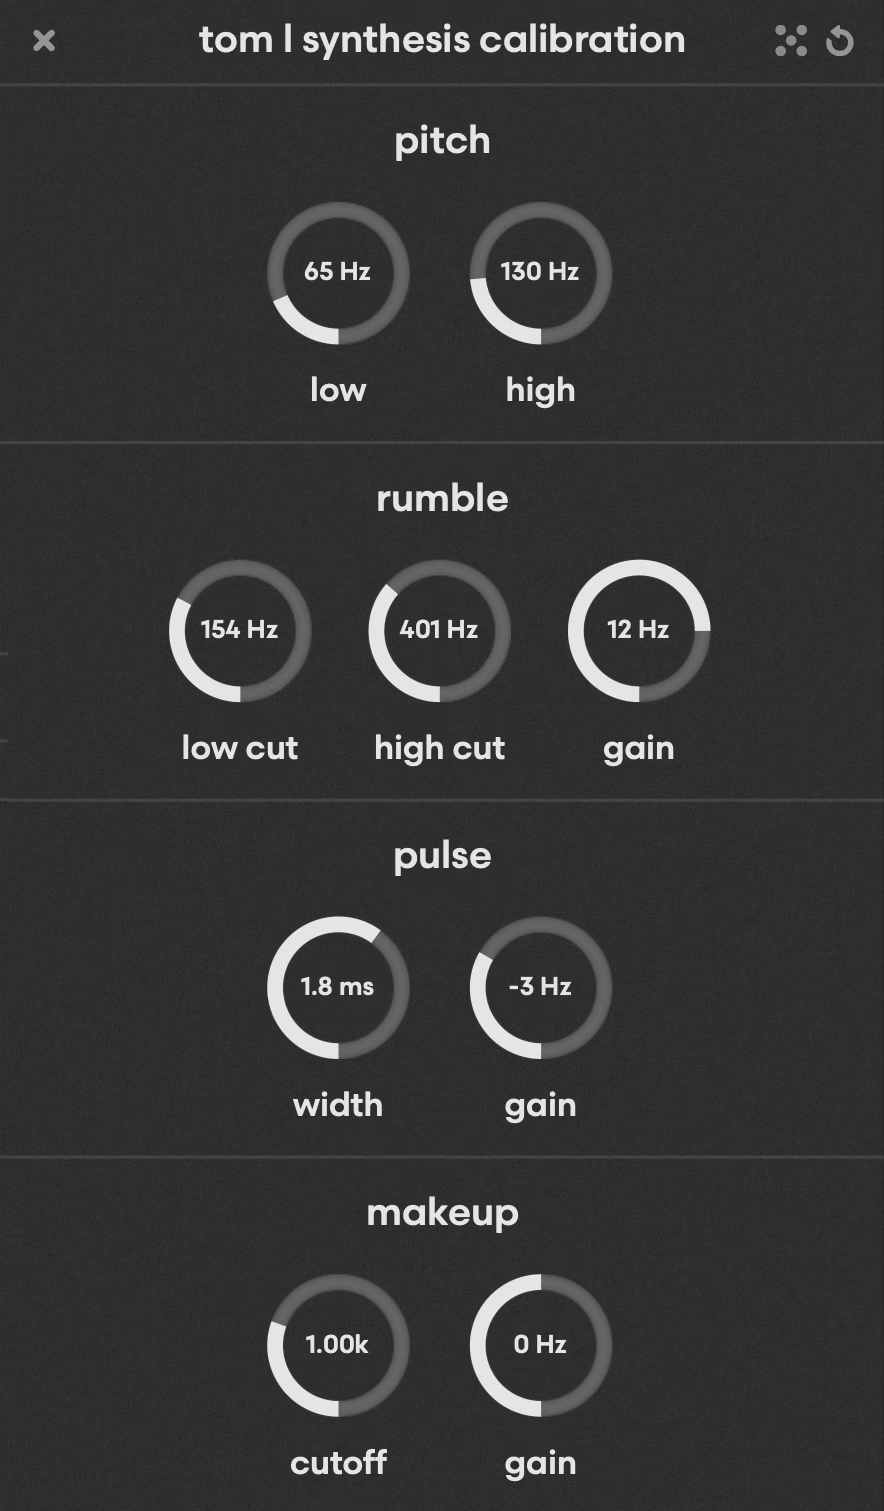
The Pitch menu sets the default range of each tom and the Rumble menu offers high and low-pass filters as well as an overall level for the noise source.
Pulse includes a Width parameter and a Gain control for the pulse amplitude.
The Makeup section controls a shelving filter affecting the high frequencies at the end of the signal chain.
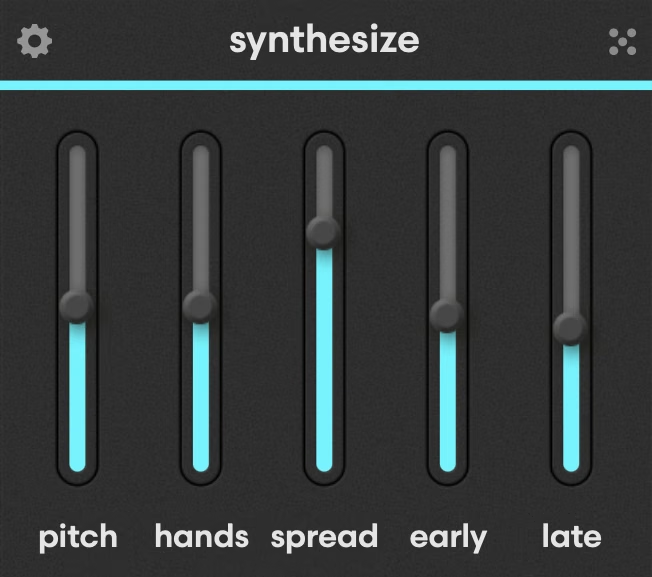
The Clap voice is divided into early and late components with multiple short envelopes acting on a noise source to simulate claps from multiple pairs of hands.
Pitch controls the cutoff frequency of a resonant filter that adds a tonal component to the noise source.
The Hands parameter controls the number of short envelopes, or individual hits, across the early component of the clap while Spread adjusts the space between them.
Early sets the decay time for the initial component of the clap sound, and Late controls the overall decay time of the late component noise envelope.
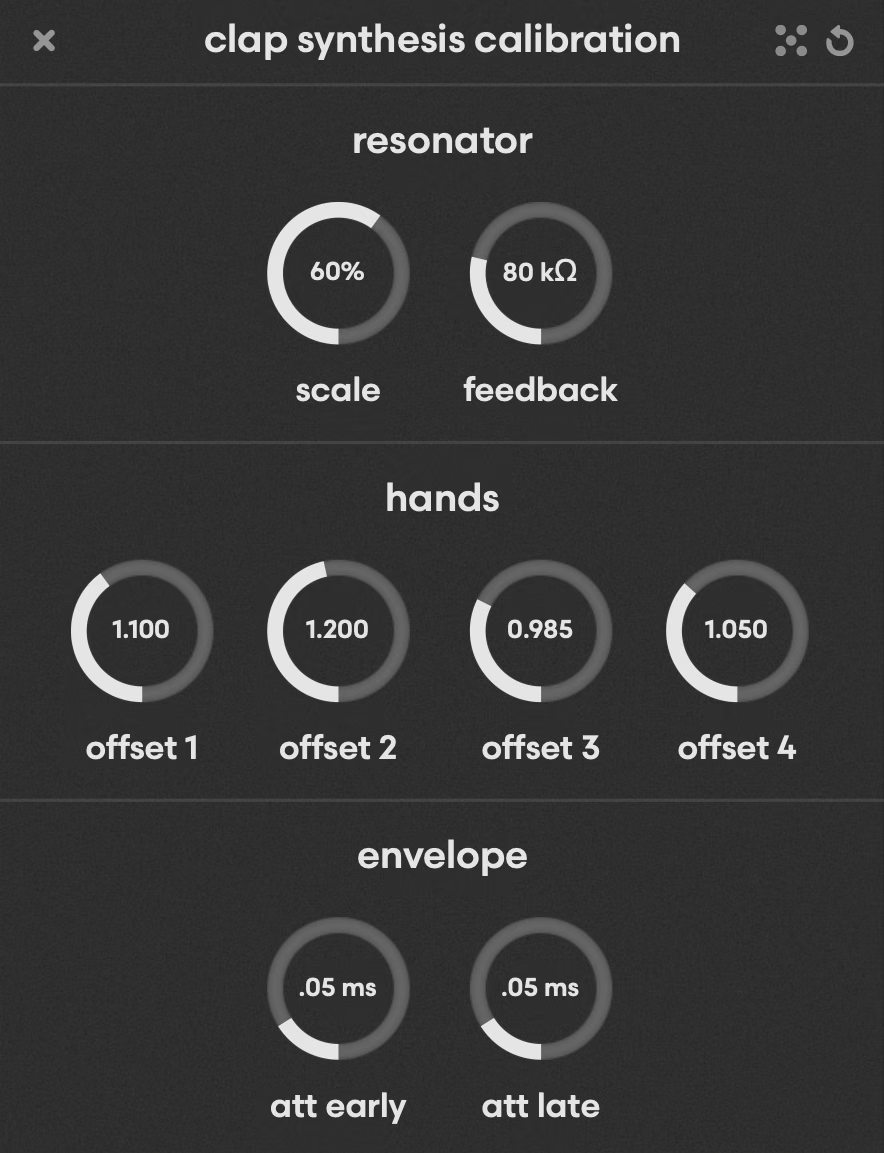
The Clap calibration menu offers a variable circuit quantity for the Feedback component of the resonant filter network and a Scale control that sets the amplitude of the pulse for additional non-linearities at higher values.
The hands menu allows you to set timing offset for the individual hand claps for a more human feel.
Finally, the envelope menu offers attack time controls for both the early and late components of the sound.
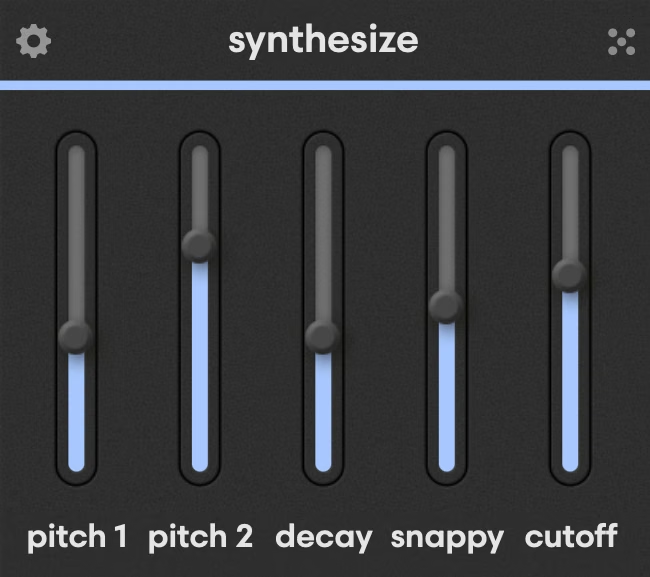
The rimshot is another voice that draws inspiration from analog circuits.
It uses a pair of resonant filters, similar to the one found in Snare B, that are excited by a shaped pulse signal.
Arranged in parallel, Pitch 1 controls the cutoff frequency of the first resonant filter, while Pitch 2 controls the same parameter for the second. The output of the filters is added together, and the Decay control sets the bandwidth, affecting the overall length of the decay.
Snappy is an additional envelope applied after the summed output of both filters that interacts with the Decay control to shape the final amplitude envelope.
Cutoff is a final low-pass filter at the end of the signal chain to control the overall amount of high end.
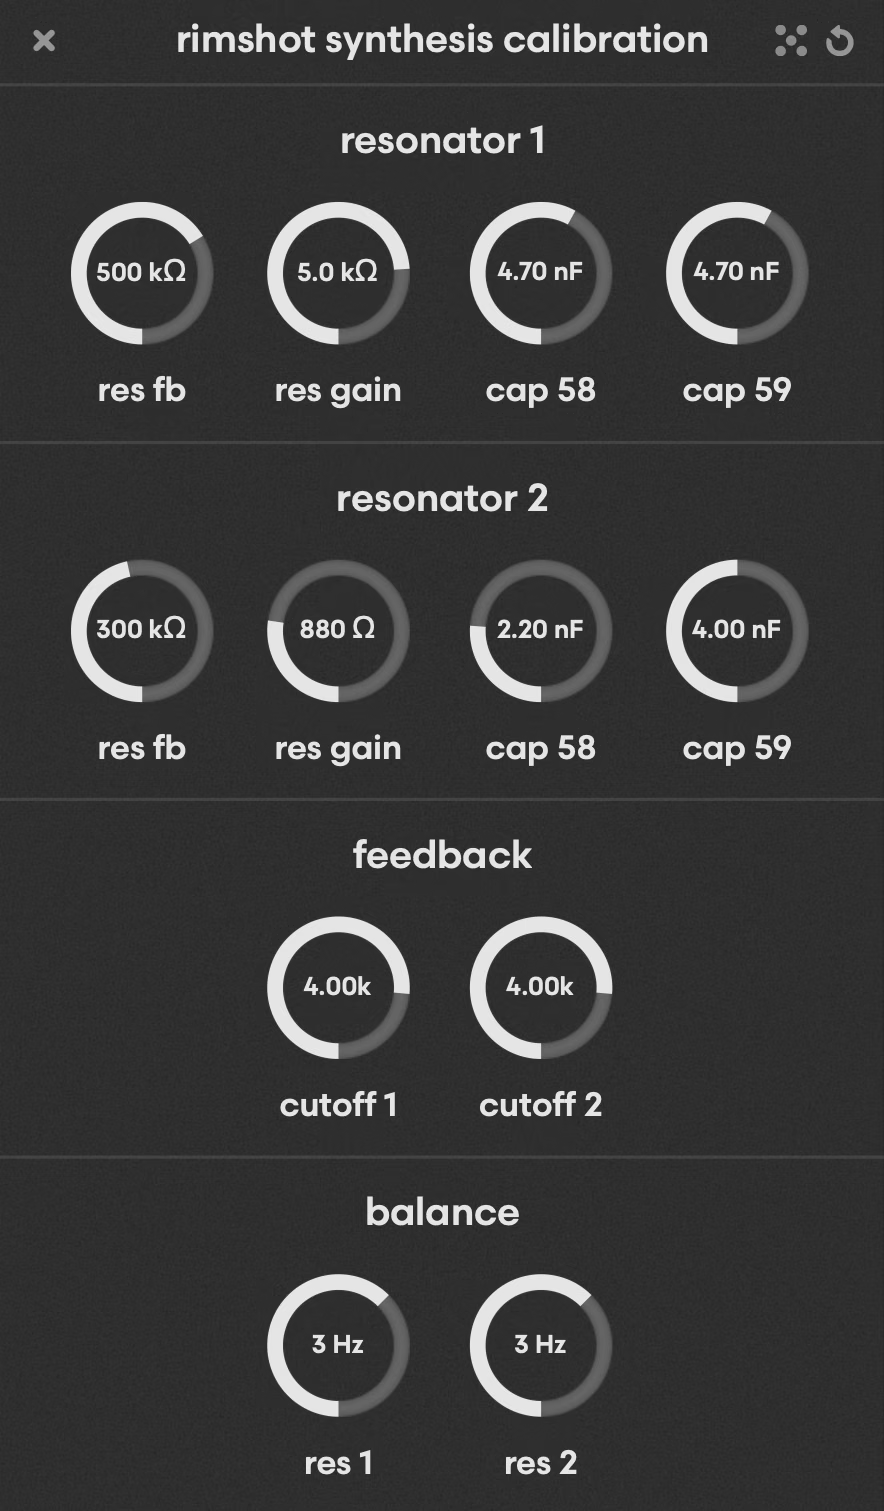
The rimshot voice is a close circuit model inspired by analog designs. Inside the calibration menu, its two resonators offer circuit quantities for Feedback and Gain in addition to variable capacitor values for components that interact with the pitch of the voice within the circuit.
Labelled cap 58 and cap 59, these simulated components don’t have a directly identifiable effect, but they can influence the behaviour of the circuit.
Try experimenting with different values for more unpredictable, circuit-bent results.
The feedback menu lets you set the cutoff frequencies of the high-pass filters in the resonator feedback path for resonator 1 and 2, respectively, and the balance menu sets the overall gain of each filter.
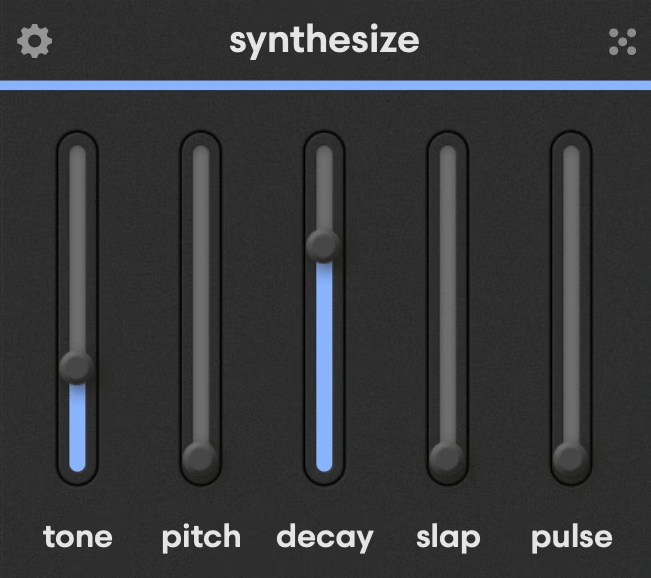
The conga voices are also based on a pulse shaped by an analog-style shaper circuit exciting a resonant filter of slightly different design.
The Pitch parameter sets the resonant filter cutoff frequency and Decay adjusts the filter bandwidth.
The Tone parameter affects a filter in the resonator's feedback path that also influences the voice’s fundamental frequency.
The Pulse control adjusts the shape of the pulse that excites the filter. The Slap control is similar to the Tom voices’ Rumble component, but focuses on short high-frequency noise.
Note: Tekno’s low and high conga voices are based on related synthesis architecture. Right-click a conga voice and choose Copy Settings to transfer its parameters to the corresponding high/low counterpart.
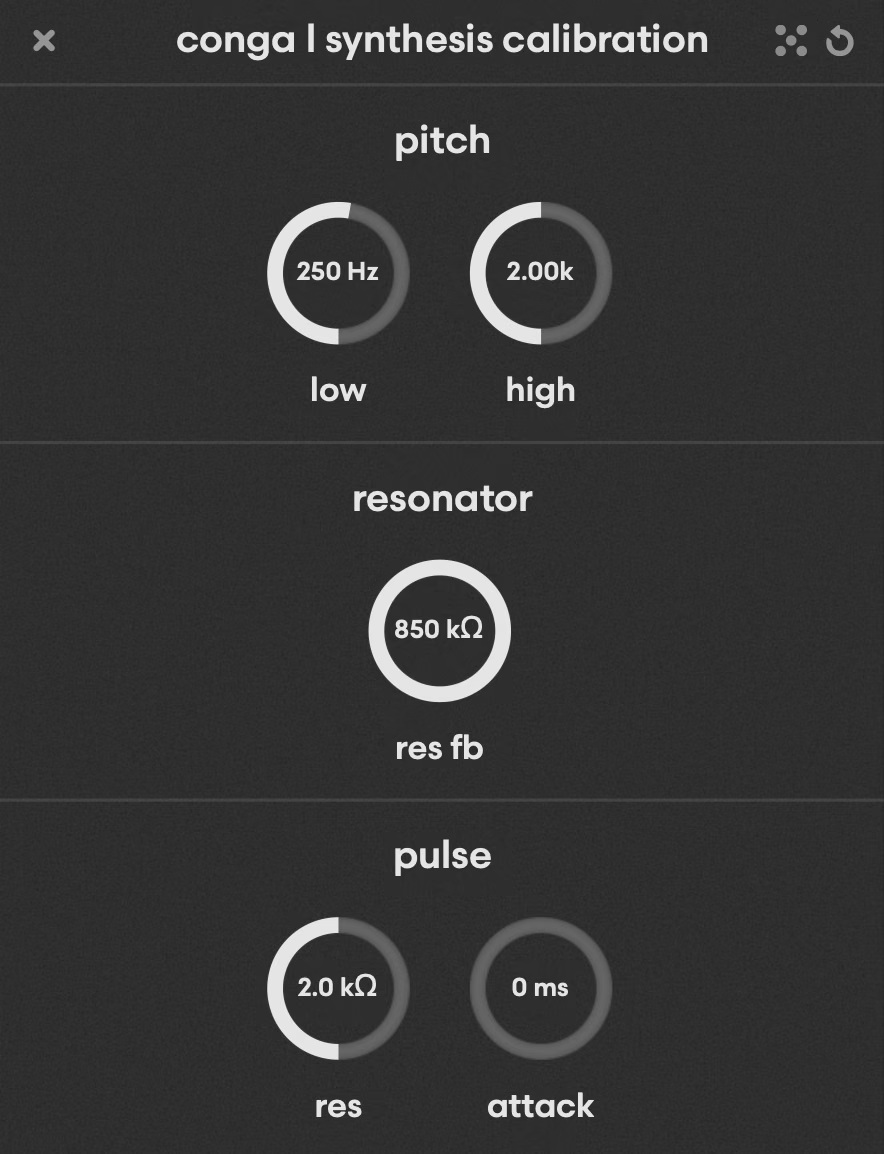
Similar to Toms L & H, the Conga calibration menus let you define the range available for each voice in the pitch menu.
Res fb sets the value of the feedback resistor in the resonator circuit and the pulse menu offers a similar Res value for the pulse-shaping filter as well as an Attack control to soften the onset of the pulse waveform.
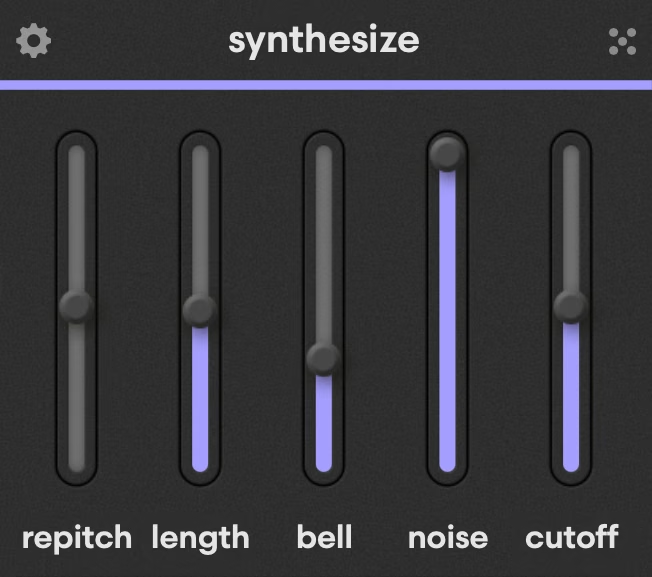
The ride voice begins with a blue noise source shaped with an envelope and fed into a ring modulator.
Length determines the decay of the envelope acting on the noise and Ring controls the amount of ring modulation. Noise sets the base frequency of the blue noise source and Cutoff controls a low-pass filter last in the chain.
Repitch varies the playback frequency of the voice’s output for a sampler-style pitch effect similar to the snare voices.
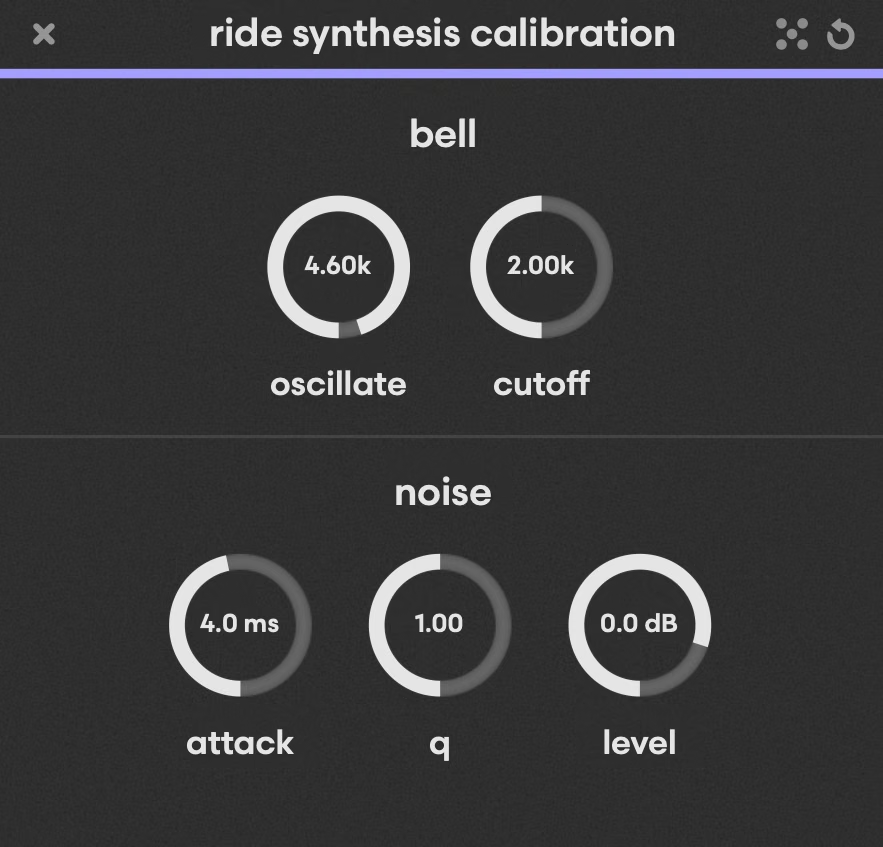
Inside the calibration menu, the Bell panel allows you to set the resonant frequency of the cymbal’s tonal component with the Oscillate control as well as the Cutoff frequency of a low-pass filter that acts on it.
The noise menu contains the Attack time of the noise envelope as well as the bandwidth (Q) of its final cutoff filter and the overall Level of the noise component.
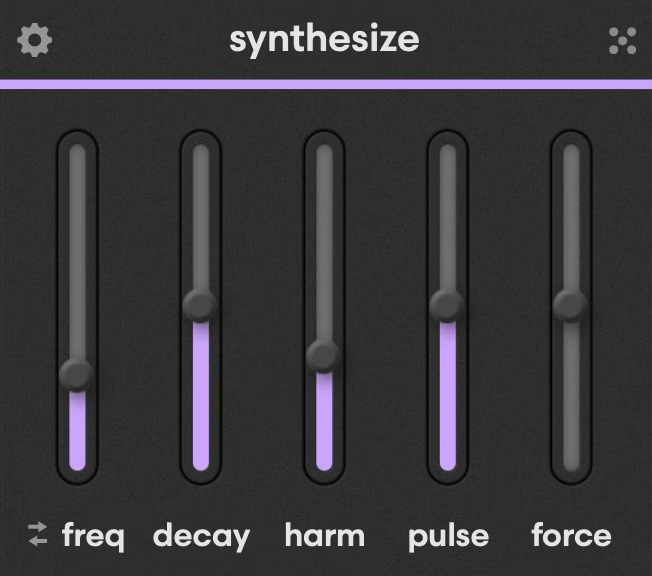
The tonal voice is based on a modal synthesis design where an analog-style trigger pulse excites a network of modal filters.
The Freq control sets the resonant frequency of the initial filter in the bank, influencing the base pitch.
The Force control sets the distribution of harmonics with higher values introducing more inharmonic relationships.
The Harm control sets the number of harmonics present above the fundamental and the Pulse parameter adjusts the total amount of high end in the pulse signal that excites the filters.
Decay sets the total decay time for the Tonal voice.
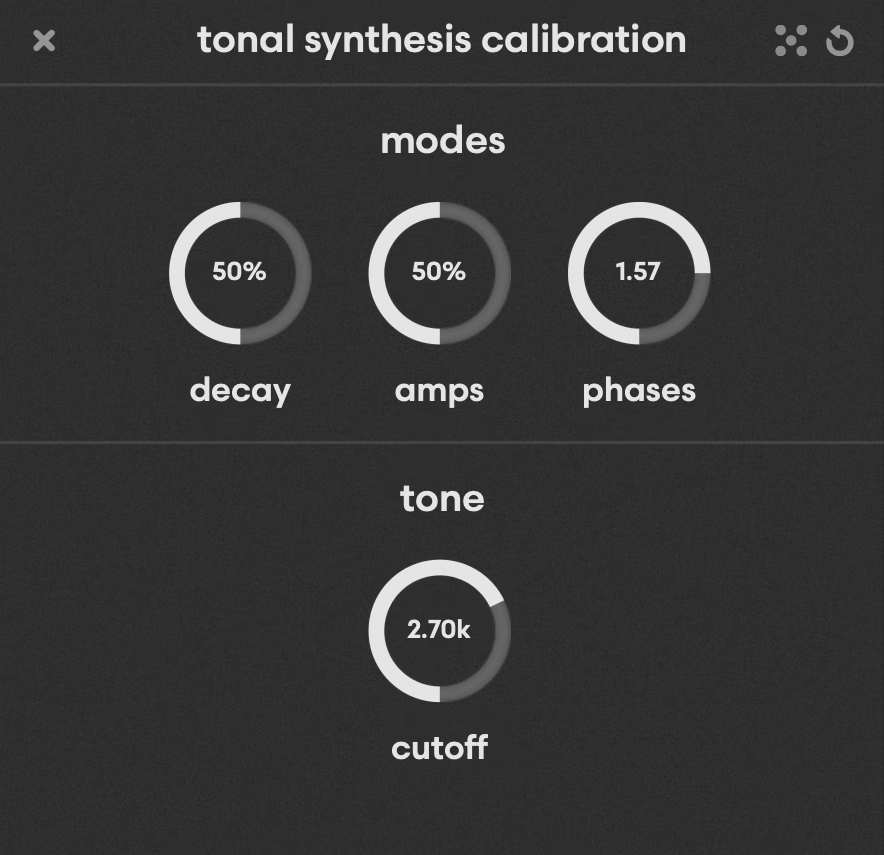
The modes panel controls the behavior of the modal filters inside the filter bank.
Decay sets the spread of decay times across the set of harmonics and Amps sets the spread of amplitudes.
Phases adjusts the phase of the modal harmonics relative to one another, but its effect can be subtle.
Finally the tone panel offers a global low-pass filter Cutoff last in the chain for tone shaping.
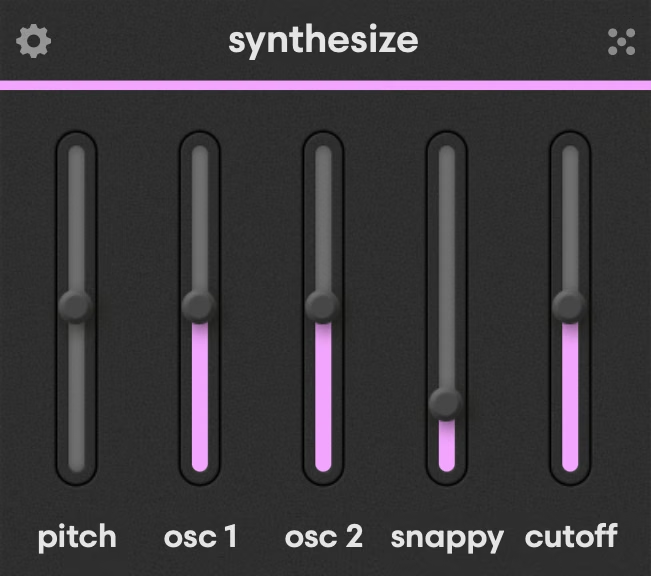
The cowbell voice is based on a pair of digitally generated square wave oscillators shaped by an analog-modeled envelope component.
Pitch is a multiplier for the frequencies of the two square waves. Osc 1 and Osc 2 set their relative levels.
Snappy is a uniquely shaped envelope that sets the total decay of the voice and Cutoff acts as a global high-pass filter placed last in the chain.
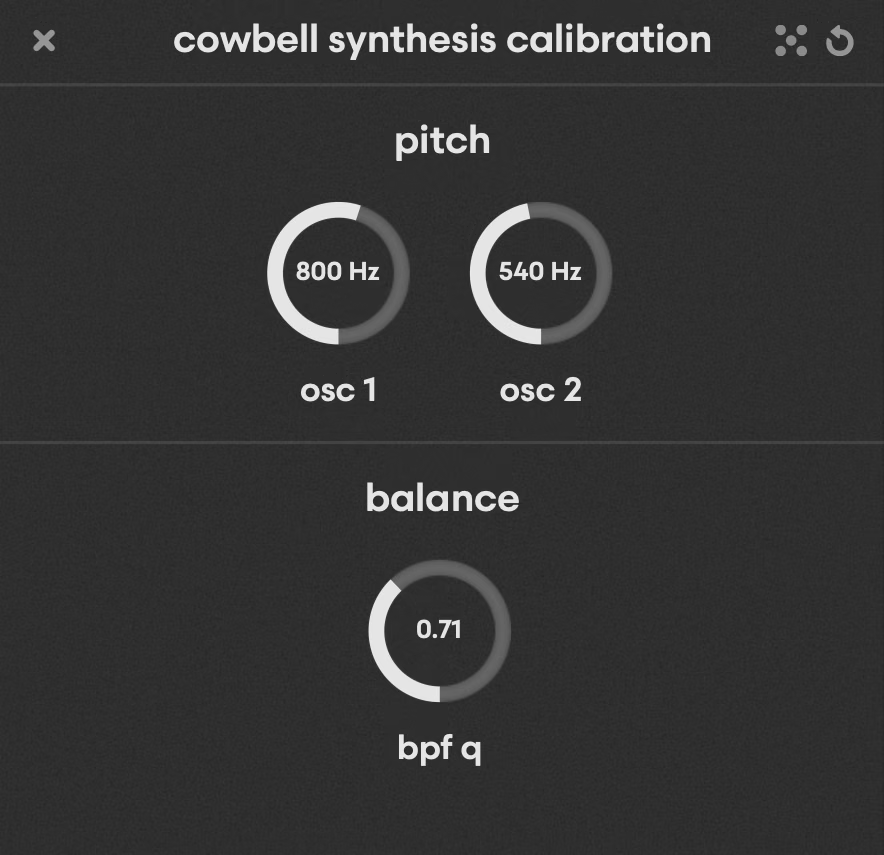
The pitch menu sets the fundamental frequency of each oscillator in Hz or note values using the Osc 1 and Osc 2 controls.
The Bpf q parameter sets the bandwidth of the global filter at the end of the chain.
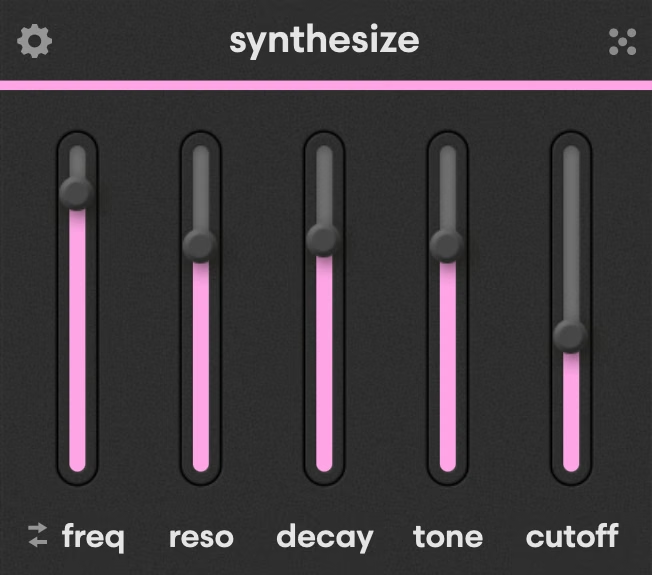
The block voice is an analog/digital hybrid with a trigger pulse and pulse shaper, but its resonant filter is a non-linear digital design.
Freq sets the cutoff frequency of the resonant filter and Reso adjusts the Q. Decay is a damping parameter for the resonator and Tone controls the filter drive intensity.
Cutoff is a high-pass filter placed after the voice signal chain for tone shaping.
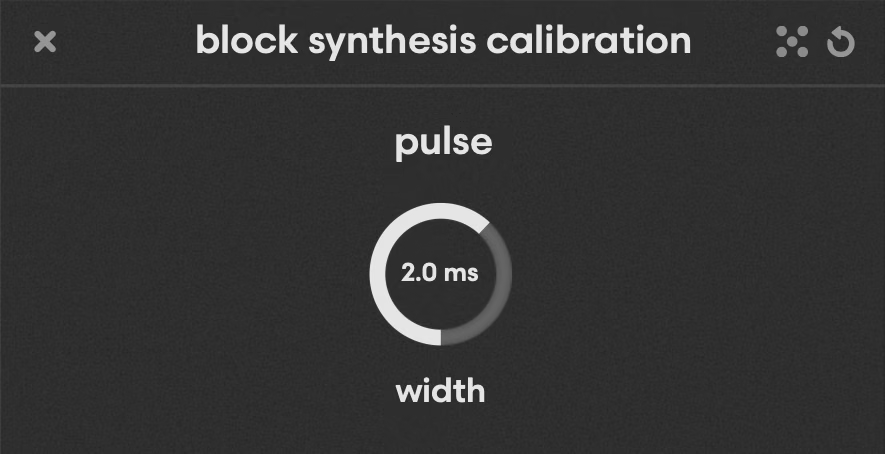
Set the pulse Width in milliseconds.
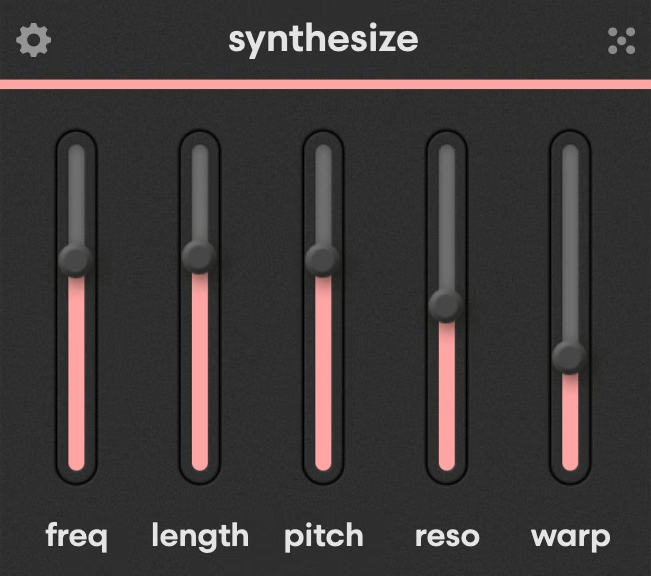
Crash is based on a white noise source with a comb filter adding coloration and tonal quality.
Pitch sets the center frequency of the comb filter, creating the pitched component of the sound.
Freq controls the cutoff frequency of a resonant filter shaping the noise and Reso adjusts its Q.
Length sets the overall decay time of the crash voice and Warp is an additional parameter for the low-pass filter that adds a downward pitch envelope to the noise source.
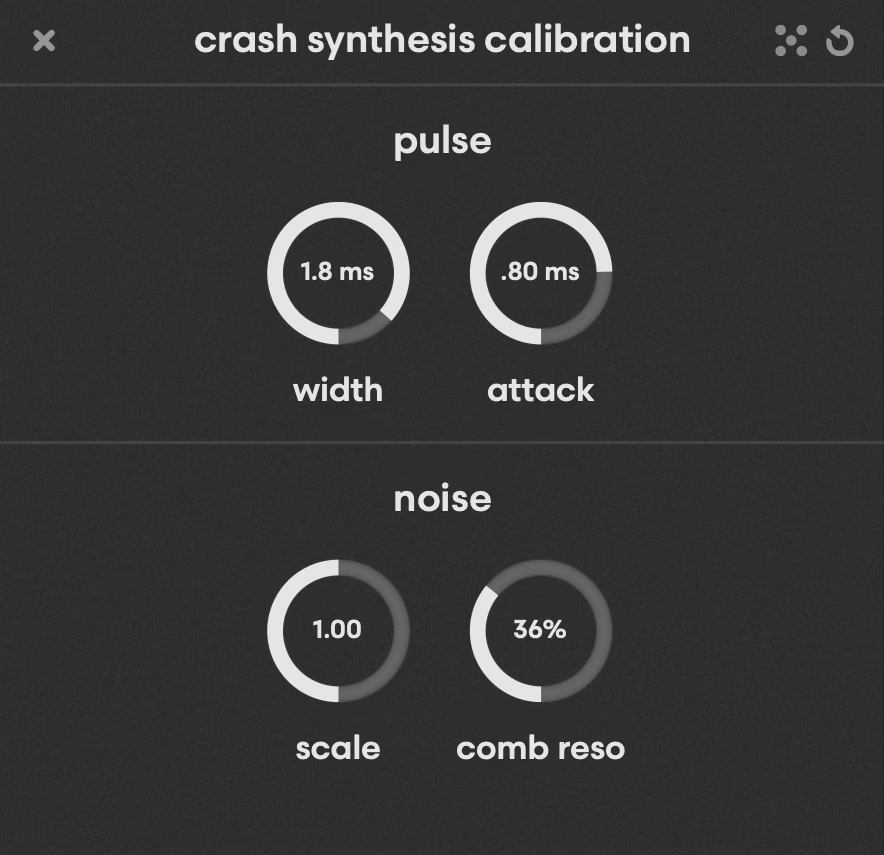
The crash calibration menu includes Width and Attack time controls for shaping the pulse signal, and Comb Reso sets the intensity of the comb filter feedback.
Scale adds some additional harmonics to the noise source to alter the tone before interacting with the comb filter.
The Effects panel for each of Tekno’s 18 voices is specially curated to provide ideal sound design capabilities for each instrument’s role in the kit.
This section will provide a short description of each effect, noting which voices include it and the calibration parameters available.
Available for Kick A and Kick B
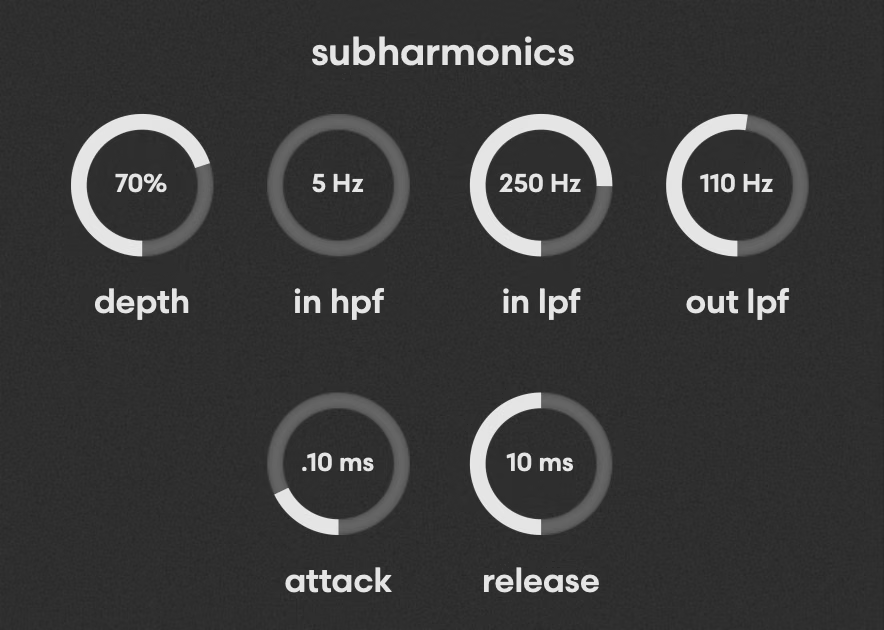
The Sub effect is an analog-style frequency divider octave down effect for adding additional low frequency content to the kick voices.
Since the fundamental frequency of the kick voice is set in the synthesize menu, the Sub effect is always tuned to the correct frequency and does not introduce artifacts from the analog-style pitch shifting process.
Turning up the Sub slider increases the level of the synthesized subharmonic in the signal.
Calibration
Available for Kick A, Kick B, Snare A, Snare B, Hat A, Hat B, Hat Op, Tom L & H, Clap, Rimshot, Conga L & H, Tonal and Block
The Exciter effect is loosely based on a 70s-style hardware Exciter that uses phase shifting and synthesis of musically related harmonics to increase the perceived intensity of the high end and upper midrange.
Calibration

Available for Kick A, Kick B, Hat A, Hat B, Hat Op, Clap, Rimshot, Ride, Cowbell and Crash
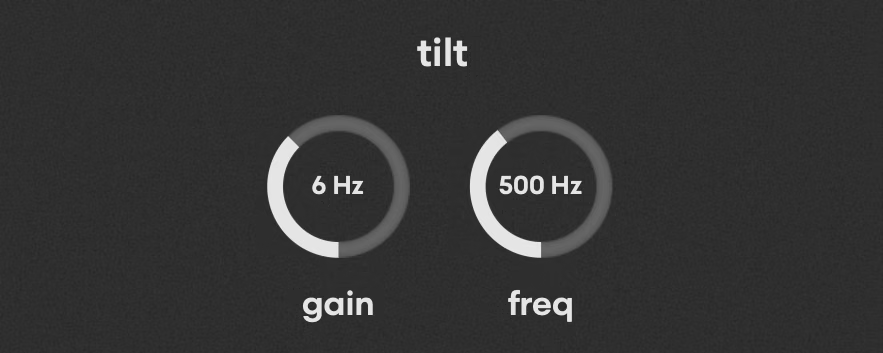
Tilt is a simple but musical EQ that works by boosting frequency content above a set corner frequency while cutting the material below the set frequency by an equivalent amount.
Positive values on the slider add highs while cutting lows, and negative values boost lows while cutting highs.
Calibration
Available for all voices
Satur is an analog-modeled tape-style saturation effect for adding warm drive and harmonics.
Calibration
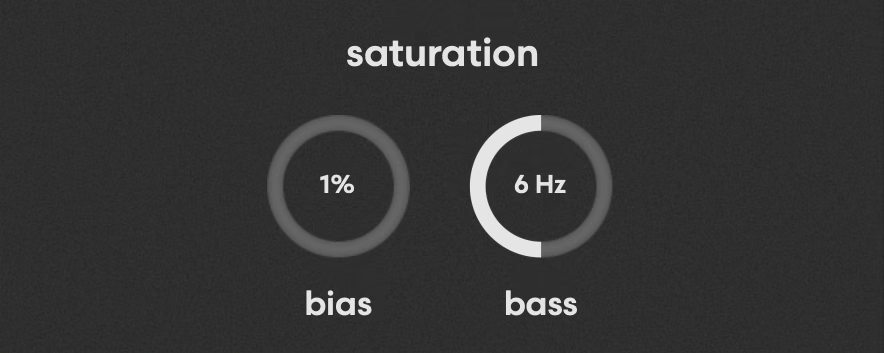
Available for all voices
A stylish, lightweight reverb voiced to pair effectively with Tekno’s drum synthesis engines.
Calibration (Master calibrate section)
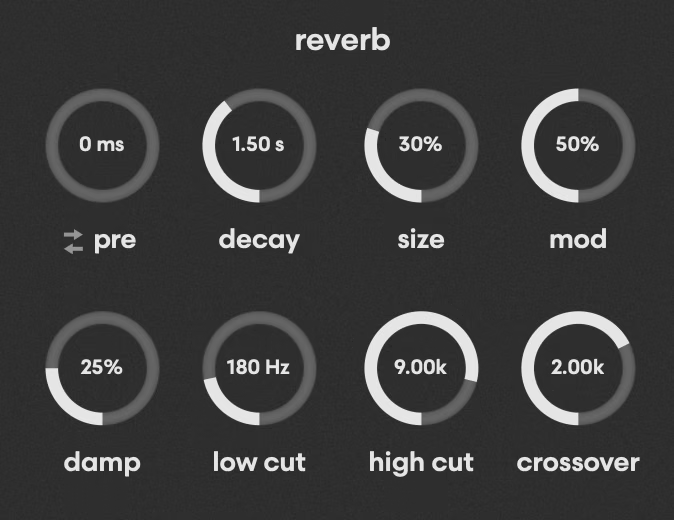
Available for Snare A, Snare B, Rimshot, Clap and Block
Disper is a dispersion effect that uses a chain of all-pass filters to create a delay between the high and low frequencies. It creates a powerful pitch modulation effect that helps emphasize the body of the drum sound.
Calibration
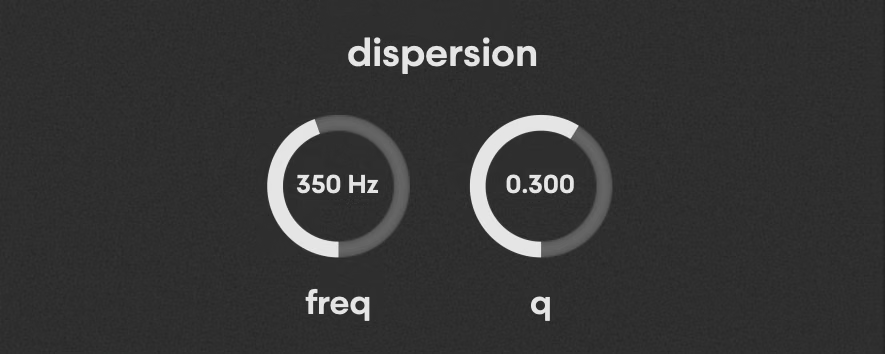
Available for Snare A, Snare B, Tom L & H, Clap, Conga L & H, Tonal and Block
Comp is an analog-style compressor loosely based on a vintage VCA circuit. The slider controls the input gain to a circuit with a fixed threshold for additional compression as you turn it up.
Calibration
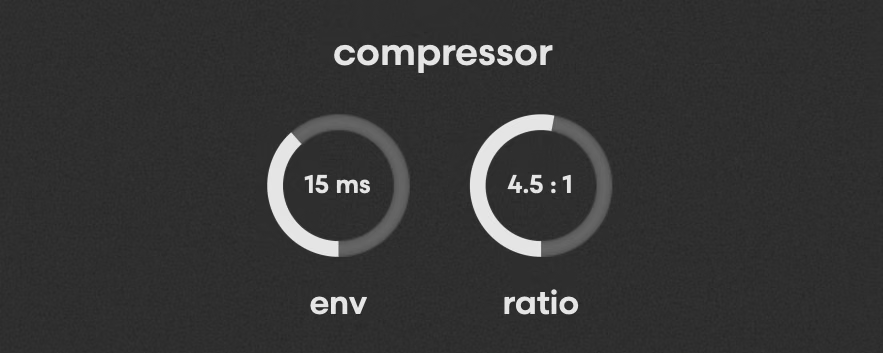
Available for Hat A, Hat B, Hat Op, Ride and Crash
Ring is a classic ring modulator loosely based on an analog diode circuit.
Calibration
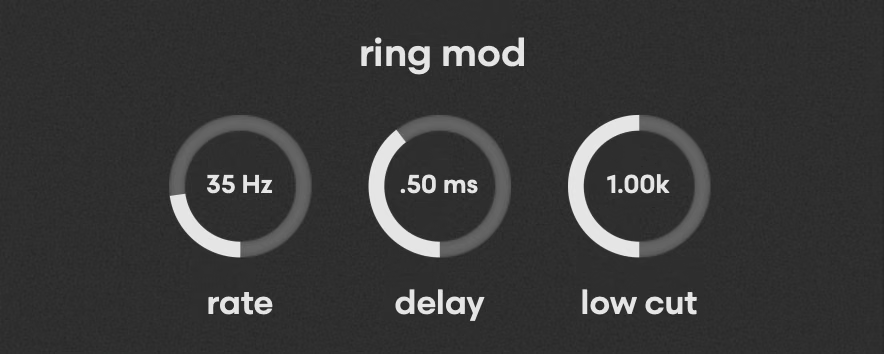
Available for Tom L & H, Conga L & H and Tonal
Drive is an aggressive, fuzzy overdrive inspired by a popular guitar pedal circuit.
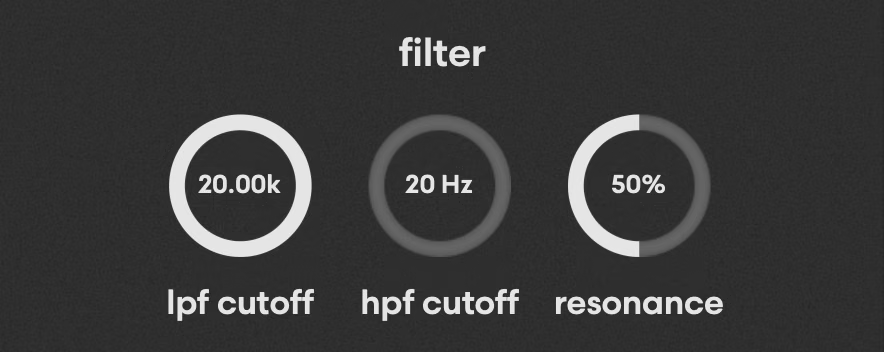
All voices include a resonant filter module with high and low-pass bands in the calibration menu of the effects panel.
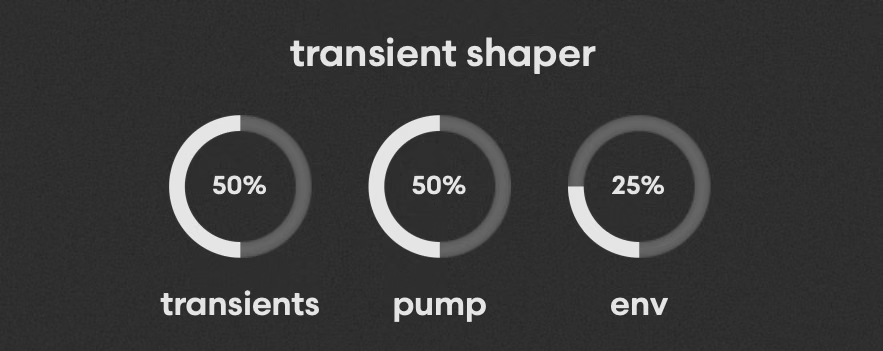
All voices include a transient shaper module within the calibration menu of the effects panel for sculpting the onset of each drum hit.
Transients adjusts the effect mix of the transient enhancement, Pump controls the intensity of the effect and Env sets the attack and release times.
The Master panel provides additional tone shaping for Tekno’s stereo output and other configurable options.
The master section acts on all voices as long as they are not routed to multiple output buses in the settings menu, with the exception of the Clipper and Limiter, which are necessary to maintain consistent level across voices.
The master panel features circuit-modeled global high and low-pass filters for the stereo output on a dual slider with values between 20 Hz and 20 kHz.
Introduce subtle variations in timing, parameter drift and hit accents for all voices.
Note: Each of Tekno’s voices now offers a configurable Humanize amount from within the synthesis calibrations menu. Set it to 100% to follow the global Humanize amount, or decrease it to apply less Humanization effect to the selected voice.
Set the threshold for an aggressive limiter meant to add weight, loudness and power to Tekno’s overall sound.
A soft-clipping digital clipper with anti-aliasing that adds harmonic distortion and cuts off the peaks of the waveform at the set threshold. The clipper interacts with the limiter to produce powerfully saturated drum hits.
Note: If clipping becomes too intense when many of Tekno’s voices are playing in the same pattern, simply lower the Clip slider’s gain value to bring back headroom.
Set Tekno’s global output level.
The five buttons along the left side of the master panel allow you to access the Sequencer and Mix views as well as fine tune the settings for the master section’s effects and functions.
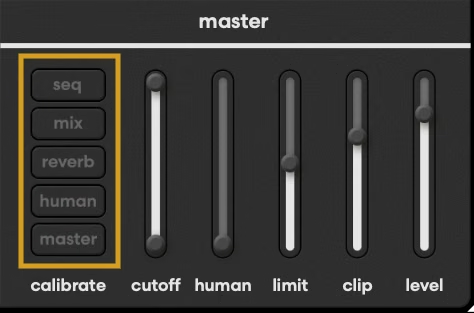
Tekno includes a full-featured onboard sequencer with dedicated lanes for all 18 voices and 32 steps per lane.
Show or hide the sequencer view using the button labeled ‘seq’ in the master calibration section.
Once in the sequencer view, click a step in any voice lane to create a hit. Tekno’s first 9 voices are displayed on page one. Click the scroll bar to view the remaining 9 voices on page 2.
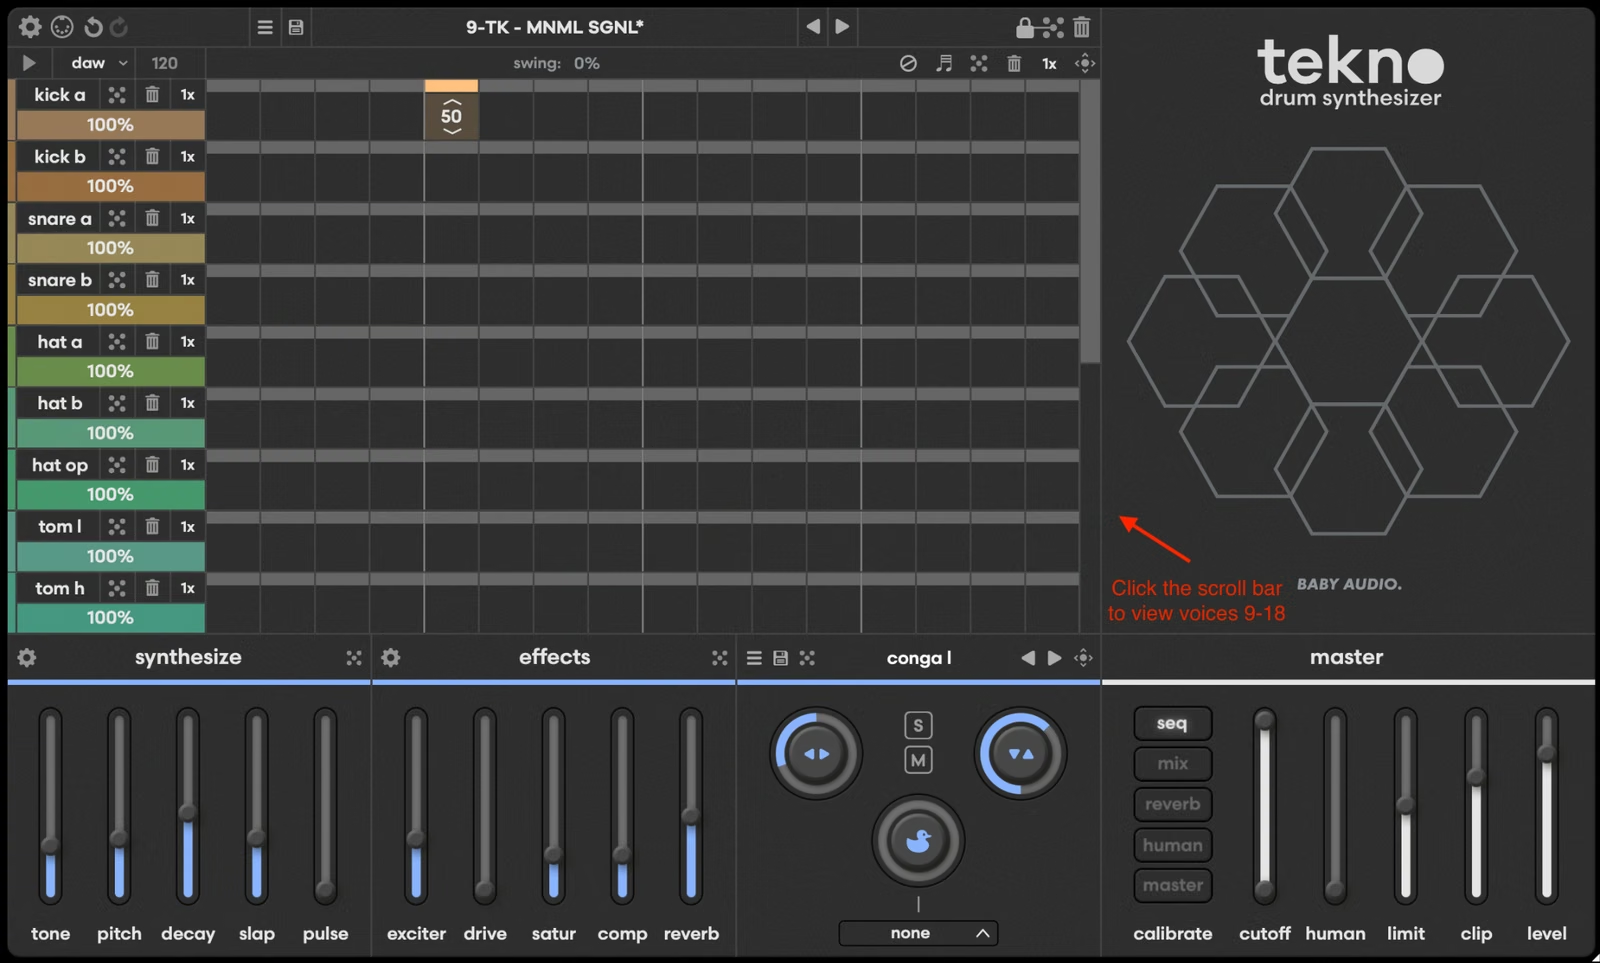
Double click an active step to remove a hit. Click and drag an active step vertically to adjust its velocity from the default 50%.
Option+click (Mac) or Alt+click (PC) on any step to auto-fill all steps from the start of the lane up to the selected position.
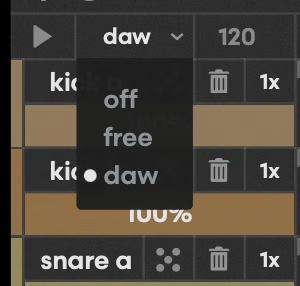
Tekno’s sequencer can be set to follow the host tempo in DAW mode or play freely in FREE mode.
Setting the sequencer to OFF ensures Tekno will respond only to MIDI data from the host application.
The right corner of the sequencer’s top menu includes the following tools:

Lane shorten disables steps in the selected lane to create polyrhythms and rhythmic offsets.
To shorten any lane to a custom length, select the circle-slash (⊘) symbol from the sequencer view’s menu panel and click the step where the pattern should reset.
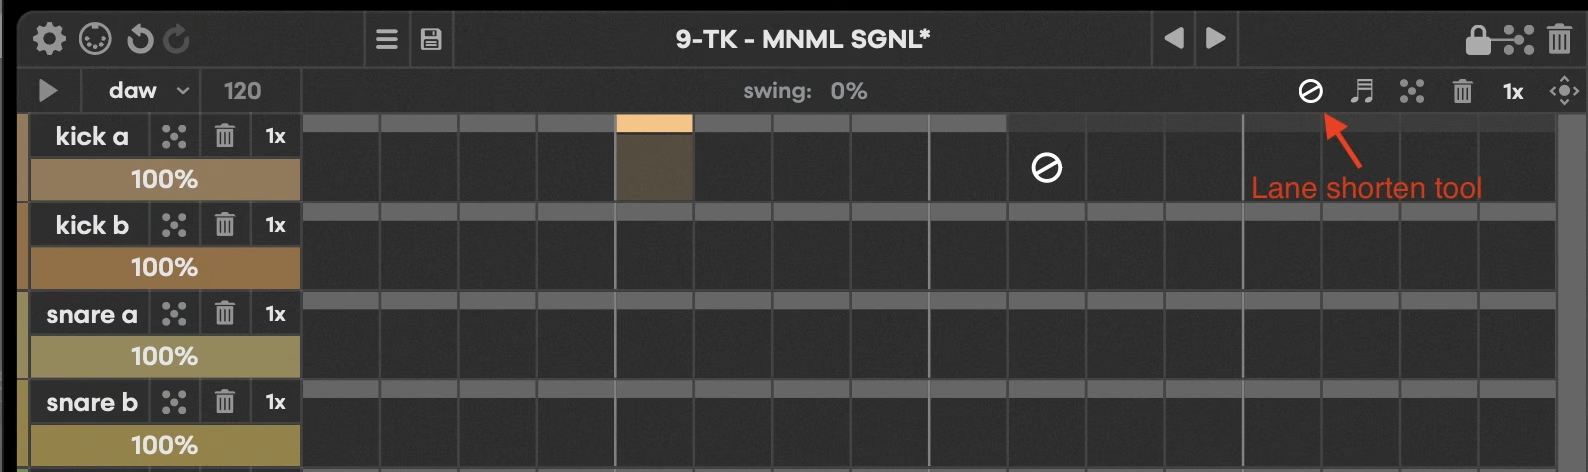
The lane will restart from the beginning as soon as it reaches the truncated step, even if the global sequence hasn’t completed. This creates independent loop lengths for instant polyrhythms.
Select the 32nd note tool to place two notes of equal duration in the space of one regular step. This is useful for fast rolls, grace notes, or adding subtle rhythmic detail.
Tekno’s sequencer randomizer uses the same smart approach as its patch and voice randomizers, ensuring results that stay musical and usable.
Randomize a single lane for quick variation, or randomize the entire pattern for instant beat creation.
Delete all steps in the current pattern.
Set the playback speed for the full sequence or override it per lane. This allows individual voices to run at half-time or double-time for additional flexibility.
Export the current sequence as a MIDI file by dragging the drag icon to a MIDI track or folder. All notes are mapped to Tekno’s internal drum layout for easy editing.
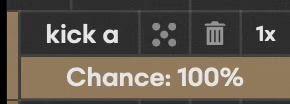
Chance determines the probability that an active step will play. At 100%, every step plays—at lower values, hits become increasingly unpredictable.
When set to 50%, each hit in the pattern has an equal chance of sounding or not sounding when the playhead reaches it.
Experiment with different chance values to create interesting variations that appear unpredictably.
Engaging the mix calibration button replaces Tekno’s honeycomb voice grid with a level fader for each voice, including mute and solo buttons:
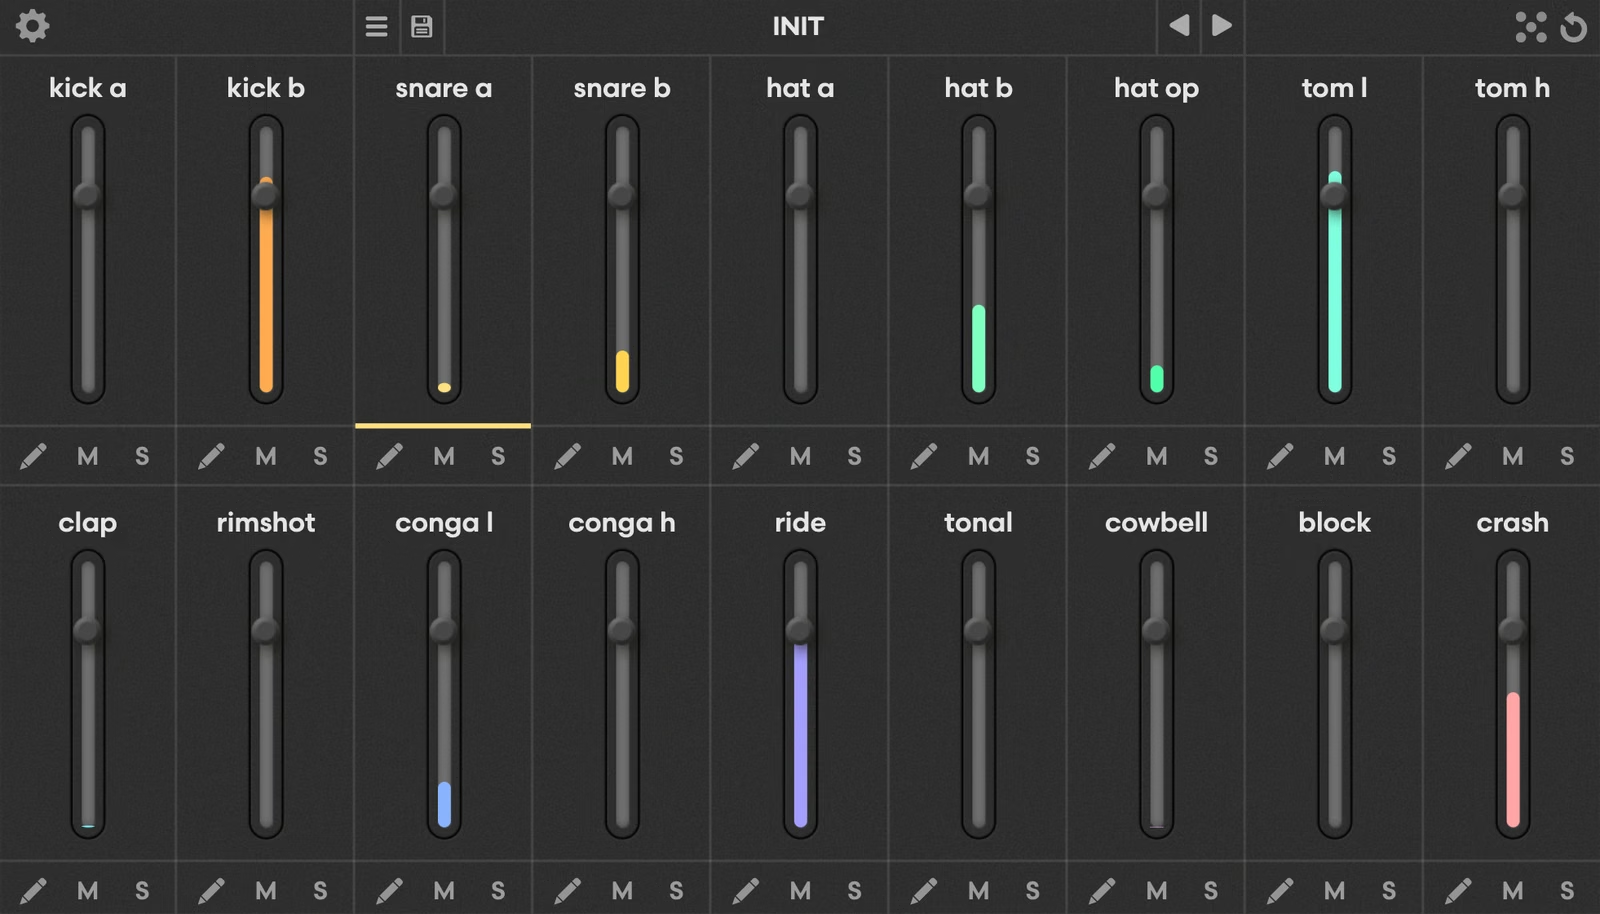
Use the mix view to quickly balance levels between multiple voices with a traditional bank of mixer faders.
To exit the mix view, click the lit mix button in the master panel calibrate menu.
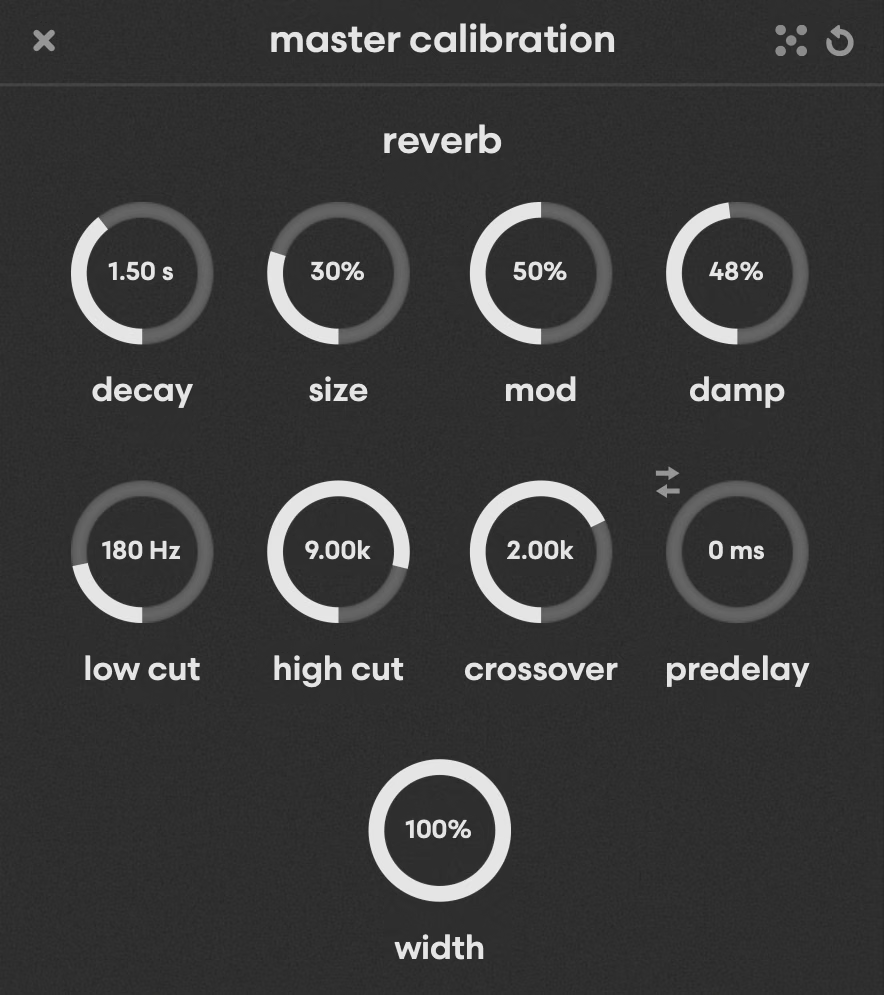
The reverb calibration menu sets the global parameters for the reverb applied to all voices from their effects panel.
Adjust the intensity with which the global Human setting affects timing, accent probability and parameter ranges.
The master calibration menu offers additional fine grain controls for other functions within Tekno.
Tekno comes equipped with several shortcuts to speed up your workflow.
Tekno comes loaded with over 50 kit presets created by leading producers, artists and sound designers.
Preset credits (and special thanks to):
An email with instructions will be delivered to you right after your purchase, however you can always go to www.babyaud.io/account to view your license keys and download your software. After downloading, unzip the file and select either Mac or PC depending on your system.
If you have an active subscription to the Plugin Collection Plan, Tekno will appear in your Baby Audio Manager app for download.
Make sure your machine is registered, get the software by clicking ‘Download’ and follow the instructions to install.
Activate your software by entering the license key that was emailed to you when you bought Tekno. Serial keys are entered in the ‘trial mode’ open screen. If you have any problems activating, please email support@babyaud.io.
If you’re running Tekno in trial mode, please note that the trial will output 5 seconds of silence every 60 seconds. To buy the full version, go to: https://babyaud.io/tekno
Please read our End User License Agreement here: www.babyaud.io/eula
We hope you’ll enjoy Tekno! If you run into any issues or have questions along the way, you can always contact us at support@babyaud.io.


.png)