Multi-effects plugins put a variety of sound design capabilities into a single convenient package.
From simple combined tools to flexible effects racks and workstations, multi-effects are more common than ever in music production.
But for some producers, the benefits of using multi-effects plugins aren’t exactly clear.
After all, why should you use one plugin for multiple effects when you’ve got so many to choose from in your plugin folder?
The truth is that multi-effects offer benefits for both creativity and workflow that you can’t get by just chaining one plugin after another.
In this article, I’ll explain the basics of multi-effects plugins, break down the essential benefits and suggest five techniques to help you use them creatively in your mix.
What are multi-effects plugins?
Multi-effects plugins are any third-party plugins that combine two or more effects in the same instance.
While many single effects offer multiple functions, true multi-effects combine different plugin types that may be used simultaneously or in unique configurations.
Multi-effects are often used in situations in which certain effects are commonly used together, or when a specific benefit arises from having multiple effects in the same package.
While some users consider single-purpose effects to be superior, today’s multi-effects aren’t limited by a lack of processing power. That makes them just as capable as traditional plugins for many applications.
Not only that, some performance gains can be achieved with multi-effects that run multiple complex processes in more efficient ways than stacking plugins together in an insert chain.
Why use a multi-effects plugin?
As I mentioned above, single-purpose plugins and multi-effects are on a more even playing field thanks to modern computing resources.
But that still might not be enough to convince you they’re worth using.
Here are a few reasons to consider using multi-effects over single effects for practical purposes
Plugin performance
Every plugin in your session needs to process audio from your DAW, apply its effect, and pass the result to the next plugin in the chain.
Many plugins use oversampling or floating-point calculations for the best quality during processing. Oversampling increases the internal sample rate to reduce aliasing, while floating-point processing preserves dynamic range and avoids clipping.
If oversampling is used, the plugin must eventually downsample the audio to its original rate for the next step in the chain.
In complex effects chains, these processes may occur repeatedly, consuming valuable CPU resources at each step.
It’s one of the reasons why some manufacturers have developed effects racks that combine their most popular plugins. In these multi-effects plugins, oversampling and other conversions occur only once, resulting in increased efficiency.
Multi-effects workflow benefits
If that all sounds a bit technical, you’re not wrong.
The performance and sonic benefits are real, but most producers are concerned about workflow.
Luckily, multi-effects plugins have a lot to offer here too.
Here are my top workflow benefits that come from using Multi-FX in place of multiple single effects
Fast and easy sound design
When you work with a folder full of plugins, there’s always a bit of option paralysis that comes with deciding which one to use.
After all, if you spend twenty minutes tweaking a patch only to discover that you’ve chosen the wrong tool, you’ve wasted your precious production time.
But that can make it all the more difficult to choose. If you’re like me you might have hundreds of plugins—or more.
Finding one that works, especially in combination with others in the chain can leave you scrolling through options instead of making music.
Multi-effect plugins give you a set menu of options designed with care to work in tandem.
It gives you easy access to a set of complimentary effects without loading up new plugins in your channel strip.
We designed Transit 2 to be a perfect palette of paints for the most creative effects tasks in your workflow.
Each module complements the others and they’re meant to be used together in unique ways!
While Transit 2 is most commonly known as a transition effect, plenty of producers love to use it as a standalone multi-fx workstation for creative processing.
Here’s Andrew Huang demonstrating a few his favorite multi-fx patches from Transit 1.
Global capabilities across effects
When you have a selection of effects acting on your sound, the real fun comes when the properties of one can influence the others.
You can always automate multiple effects or sidechain them into one another in your DAW, but that can be time consuming in its own right.
One of the best things about Transit 2 is how easy to it is manipulate multiple parameters, set them into motion and even let them react in unpredictable ways to your incoming audio signal.
There are too many possibilities to even list here, so I’ll
Less is more?
One complaint often leveled against multi-effects is that they only offer simplified versions of the effects they bundle together.
While this is not always true, it can be a benefit in cases where simplified effects are more effective.
Some single-purpose plugins are outfitted with so many features that you could spend hours learning them and still not be an expert user.
When something is designed to be the most capable it possibly can for a single task, there’s a tendency for features to get out of control.
If you’re focused on creativity, inspiration and moving forward in your workflow, you know that the right tool for the job is sometimes the simplest one.
In fact, that’s often been our philosophy here at Baby Audio—simple and fun beats complex and slow every time!
When it comes to Transit 2, we wanted to include effects modules that were simple enough to fit within a tile in the plugin’s grid layout, but offered enough unique behavior and raw power to give you inspiring results right away.
You’ll have to try it yourself to see if we succeeded!
5 Multi-effects Ideas with Transit 2
With the basics out of the way, here are five multi-effect ideas to try with Transit 2
Aggressive Pumping Reverb
Combining reverb with other effects can be lots of fun if you’re willing to experiment with effect order.
For example, try setting up an OTT module with aggressive settings after a long reverb tail with the Retro Verb module.
The reverb’s trailing decay will accentuate the pumping effect from the combined compression and expansion, adding even more intensity.
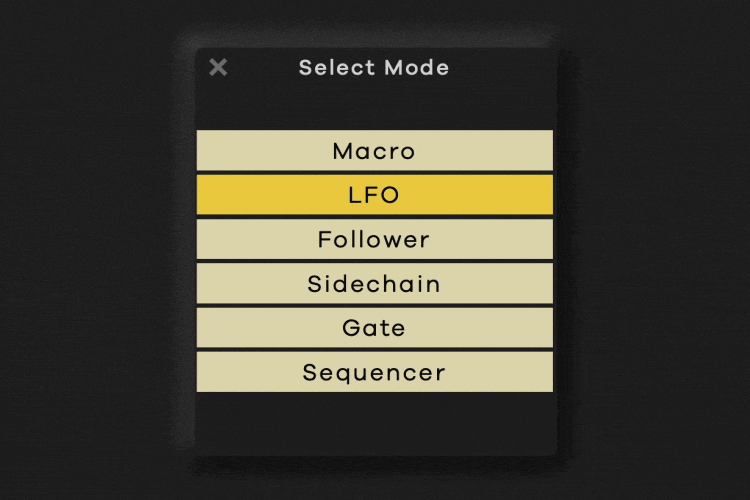
Sidechain effects accents
Sidechain is one of Transit 2’s most interesting new motion modes.
This option lets you trigger motion-enabled effects with the dynamics of an external source signal.
Try connecting a busy signal like a drum loop to trigger multiple dimensions of motions
Multi-dimensional lo-fi
When people think of lo-fi effects, they’re usually referring to a number of different qualities found in vintage recordings.
Combining multiple lo-fi elements together can help create a more convincing retro texture that doesn’t lean too heavily on a single effect.
It’s the reason why lo-fi effects are often bundled together, like in our classic Super VHS plugin.
Try using a mix of the Noise, Speaker, Distortion and Bitcrush modules to dial in an engaging lo-fi effect with diverse characteristics.
Swept filter washouts
Adding a filter after a chain of reverb, delay and modulation gives you powerful sweeping effects that sound great in a transition.
Transit 2 makes it easy to create thrilling filter sweeps with as much textured ambience as you can create with its multiple delay and reverb options.
Try adding saturation or distortion on top to increase the harmonic content in the filter sweep for even more radical transitions.
Dynamic glitch effects
Glitch effects need to shift and evolve to stay interesting over time.
With Transit 2, it’s easy to use the dynamics of the incoming signal to add animation to glitchy effects that moves in time with the beats.
Try using the Loop, Reverser, and Warp modules together in Follower mode to create tempo-synced chorus of glitched out effects
Multi-effect madness
Multi-effects provide a distinct set of creative possibilities in your production workflow.
From handy combinations of related effects to full suites of sound design tools, they’re great for anyone who loves experimenting with new combinations in sound.
If you’re looking for a unique take on the concept, Transit 2 combines the inherent power of a great effects library with inspiring dynamic control.
Try it for free to see what’s possible with Transit 2’s 28 effects modules.