No items in cart
Buy 2 Get 1 Free
Add 3 products to the cart and get the cheapest for free at checkout.
Add 3 products to the cart and get the cheapest for free at checkout.

.avif)
Audio rate modulation is a unique concept in sound synthesis.
It’s been around since the glory days of FM synths, but it’s being used in new ways inside instruments like Grainferno.
But what exactly is audio rate modulation? Why is it interesting for sound design and what new possibilities does it unlock for producers?
In this article, I’ll explain the basics of audio rate modulation, break down how it works in Grainferno and show how to use it to create unique sounds in four steps.
Let’s get started.
Modulation is a term with several meanings in the context of music and audio production.
In music theory, it refers to changing between different key signatures during the course of a piece.
In audio effects, it refers to processors that work by introducing change over time to different dimensions of the sound. For example, modulating a signal’s amplitude is usually called tremolo, while modulating its pitch is usually called vibrato. Effects like flanger and chorus modulate the pitch of a copy of the signal and blend it back in with the original in various ways.
However, synthesis takes the concept of modulation even further. If you’ve ever worked with subtractive synths, you’ve likely heard of the concept of modulation with LFOs and envelopes.
If you need a refresher on the basics, head over to our explainer on LFOs in synthesis.
For the quick version, an LFO or low frequency oscillator is used to modulate a synth’s parameters so they shift and change in predictable patterns that add interest and animation to the sound.
Since the frequency range of an LFO is much lower than that of a synth’s main oscillator, LFO modulation doesn’t sound like a distinct tone as it acts on the parameter being modulated.
Audio rate modulation is what happens when the signal modulating another parameter crosses out of the LFO range and into frequencies that can be perceived as pitched tones.
You’ll be familiar with this concept if you’ve ever used an FM synth.
In FM synthesis, components called operators modulate one another in various arrangements. An operator consists of a sine wave oscillator shaped by an envelope and it can produce frequencies ranging from LFO rates all the way to audible frequencies and beyond.
Some of the most characteristic sounds of FM come from audio rate modulation between modulator and carrier operators.
But FM isn’t the only application of audio rate modulation in synthesis. In the DAW era, many plugins support LFO-style modulation that can reach into audio rate frequencies.
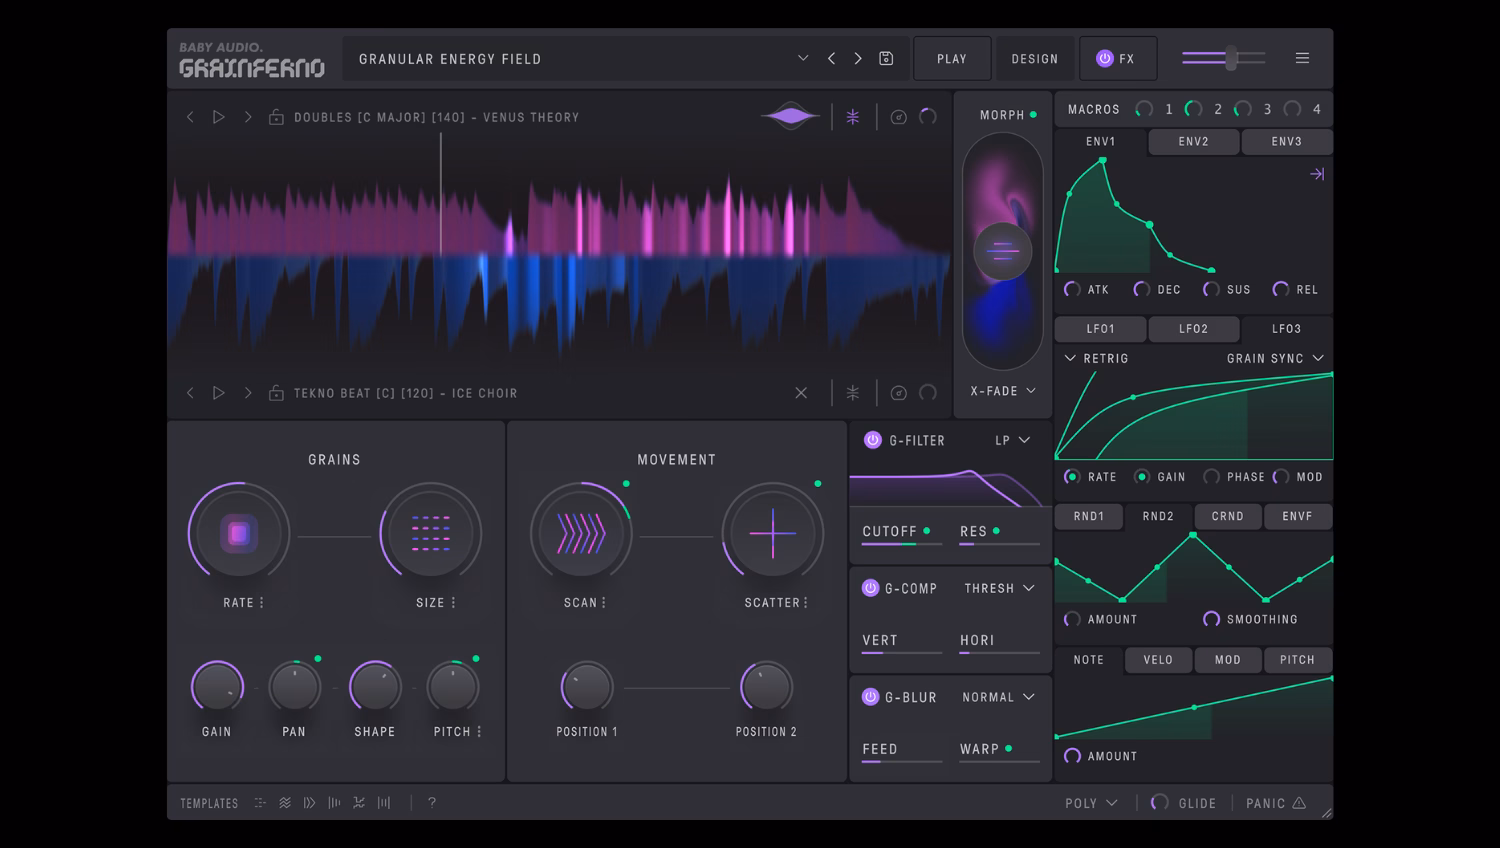
One such example is granular synthesis. A granular synth works by breaking audio down into tiny fragments that get rearranged and reassembled into new sounds.
Check out our explainer post if you need the full breakdown of what granular synthesis is and how it works.
Granular synths such as Grainferno typically include rate controls that determine the speed with which new grains are generated from the source sample.
The rate and size of the generated grains interact with one another to produce a variety of sounds from the given sample.
On top of that, the starting position for the grain engine can be shifted throughout the sample. In Grainferno’s case, this can be done sequentially using the Scan control or by adding randomness to the position value with the Scatter control.
However, when the grain position remains static, something interesting happens if the grain generation rate crosses into the audio range.
At these frequencies, grains are generated so quickly one after another that they begin to resemble a tone, the same way rapid audio rate modulation turns an FM operator into a new texture.
The result is an entirely new tone that is not derived from the content of the microsampled grain, but rather by the rate of grain generation itself. Despite this, the sound still retains some of the original sample’s character, but with a totally different expression at the fast audio rate.
To achieve this, Grainferno links the frequency value of the incoming MIDI note to the grain generation rate. That means that the tone produced by the grain engine is exactly the same as the note you play on your keyboard.
When configured this way, Grainferno always stays in tune, no matter what the source sample sounds like.
Audio rate grain generation opens up a new paradigm for sound design that may seem unfamiliar at first.
After all, the source audio no longer contributes to the pitched quality of the sound, so the results aren’t exactly intuitive.
Even so, audio rate sounds can provide quick results when you’re looking to create traditional synth-style sounds like leads, pads and basses with Grainferno.
Here’s my quick guide to getting started with audio rate grain generation and some sound design ideas to kickstart your inspiration.
The foundation of playable audio rate sounds is Grainferno’s ability to match the grain generation rate to the frequency value of the incoming MIDI note.
It means that when you play A3 on your MIDI keyboard, the rate at which Grainferno generates new grains from the source sample is exactly 440 Hz.
To set it up, select a key-mapped scaling mode in the Rate control submenu.
Grainferno defaults with the rate control in ‘key-mapped free’ mode, but it’s even easier to create quick audio rate sounds using the ‘key-mapped octave’ mode.
In key-mapped modes, the value of the Rate control sets an offset from the incoming note frequency value.
When set to an octave mode, that means you’ll only ever get the same ‘pitch class’ (or letter name of the note) no matter where you set the rate control.
That said, you’ll still need to set the rate fast enough to achieve audio rate grain generation. A good place to start is around 2 o’clock on the dial, or -3.00 octaves in key-mapped octave mode.
When building audio rate sounds, the grain generation engine begins to act like a traditional synth oscillator.
This makes Grainferno’s envelope section especially important for creating the type of sound you’re looking for.
Choose a gradual attack and long release for pad sounds, a quick onset and decay for plucks and punchy sustain for basses, just like you would with any other synth.
However, Grainferno offers two amp envelope destinations for you to choose from—GRAIN and VOICE.
In GRAIN mode, the envelope acts on the grains themselves. In this mode, the attack and release behaviour depends on the chosen Rate and Size values. This can be useful for slower rates when you want the grain to play out in full before the release stage of the envelope occurs.
But when creating audio rate sounds, you’ll likely want to keep the Amp Env in VOICE mode, which is the default setting. In VOICE mode, the envelope acts like that of a traditional polyphonic synth, allowing you to create familiar envelope behavior at audio rate settings.
Grainferno’s per-grain processors can be extremely helpful when working with audio rate sounds.
Depending on the setting of the size control, some grain length values can lead to an interesting timbral change at the expense of an apparent change in volume.
The G-Comp controls allow you to scale the level of the audio within the individual grains as they are generated, letting you bring back intensity, even with very small grains generated at audio rates.
The G-Filter acts more like a traditional filter at audio rate settings, but it too has a unique flavor that imparts, especially if you connect it to a modulation source, which brings us to…
Audio rate grain generation can be thought of as a type of audio rate modulation, but that doesn’t mean you can’t add good old fashioned LFO and envelope modulation on top.
In fact, enhancing your audio rate sounds this way is one of the best methods to bring familiar characteristics from other styles of synthesis into your granular sounds.
As I mentioned above, modulating the G-Filter control with an LFO or envelope gives you traditional subtractive filter effects with a granular twist.
But there’s much more you can do with grain generation at audio rates.
Try modulating the Grains menu pitch control for interesting harmonic effects reminiscent of oscillator sync. Or changing the size control on the fly for subtle timbral variations.
You can even shift between audio rate sounds and classic granular textures by shifting the rate control in stairstep increments.
Audio rate grain generation is one of Grainferno’s most exciting capabilities.
But it’s only a fraction of what the instrument can do. From classic grain cloud sounds, to rhythmic slicing and all out chaos, Grainferno is our deepest plugin to date.
Now that you know the basics of audio rate modulation, download the free trial version of Grainferno to experiment with it in your own tracks.


.avif)